How to use Typescript with the ASP.NET Core 2.x React Project Template
You can create a new React + ASP.NET Core project via Visual Studio or the command line…
dotnet new ReactAnd get a nice little React/ASP.NET Core starter app written using javascript.
But what if you want to use Typescript instead? To make that work you need to jump through a few more hoops.
Create React App#
As of the .NET Core 2.1 SDK the built-in ASP.NET + React templates use something called “Create React App”.
“CRA” is the standard way to quickly spin up new React projects so you can get on with building your application (without manually installing dependencies, configuring WebPack and all the other things which come with modern front-end development!).
When you run this command…
dotnet new ReactYou get a project which includes both ASP.NET Core (with some example Web API controllers) and a CRA app (in the ClientApp folder).
This is good, because it means you’re getting a standard React app which hasn’t been unnecessarily mangled/fiddled with!
The downside is (as of the time of writing) you might well end up with a pretty out-dated version of “Create React App” which lacks support for using Typescript in your project.
To see this for yourself, spin up a new React project either via Visual Studio or the command line.
You can use NPM or Yarn for the following steps.
I’ve generally found Yarn to be quicker (and have less issues with conflicting package versions) than NPM so that’s what I’ll stick to here.
You can install Yarn from here.
Open up a command prompt, change directory to the ClientApp folder and type these commands.
yarnyarn list react-scriptsThis will show you what version of the React Scripts your app is using.
In my case this reported I was on react-scripts@1.1.5 which means my app is using “Create React App” 1.1.5.
The React world has moved on somewhat in recent months and is now several versions in to 2.x.x (2.1.3 at time of writing).
Since the 2.1 release of CRA, Typescript is now supported “out of the box” which brings us to a key question. How easily can we upgrade the ASP.NET Core + React project to the latest version of CRA (and enable Typescript support)?
#1 Upgrade react-scripts#
First up you need to upgrade the version of the react-scripts used by your newly created app.
You can manually update package.json, but the safer way to do this is to run this command (in the ClientApp folder)…
yarn upgrade react-scripts --latestAt this point you’ll also want to remove all the ‘eslint’ packages as listed in the devDependencies section of package.json.
ESLint is a “linter” for javascript which will analyse your code and throw warnings or errors if it doesn’t conform to certain syntax rules (and if it contains potentially mis-spelled variable names etc.).
The latest versions of the react-scripts will automatically bring the correct versions of ESLint (and an ESLint configuration for React apps) by itself. If you also have these defined in devDependencies you’ll end up with conflicts between the versions and errors when you try to launch your app.
"devDependencies": { "ajv": "^6.0.0", "babel-eslint": "^7.2.3", "cross-env": "^5.2.0", "eslint": "^4.1.1", "eslint-config-react-app": "^2.1.0", "eslint-plugin-flowtype": "^2.50.3", "eslint-plugin-import": "^2.14.0", "eslint-plugin-jsx-a11y": "^5.1.1", "eslint-plugin-react": "^7.11.1" },Again, you can remove these from package.json manually but using yarn remove will also remove the packages from your node_modules folder and update the .lock file which yarn uses to keep track of which dependencies have been installed in your project.
Run yarn remove and include every dependency with eslint somewhere in its name…
yarn remove eslint eslint-config-react-app eslint-plugin-flowtype eslint-plugin-import eslint-plugin-jsx-a11y eslint-plugin-react babel-eslintCheck package.json now and you should see this under devDependencies.
"devDependencies": { "ajv": "^6.0.0", "cross-env": "^5.2.0" },Make sure you keep the eslintConfig section…
"eslintConfig": { "extends": "react-app"},If you now run your project and navigate to https://localhost:5001/ you should see something like this.
You’ve successfully upgraded your project to use the latest version of CRA!
#2 Start using Typescript#
Almost there, but we still aren’t actually using Typescript.
First up you’ll need to bring in Typescript as a dependency for your project and at the same time you can bring in type definitions for a few key packages which the project is already using.
Make sure you’re still in the ClientApp folder then…
yarn add typescript @types/node @types/react @types/react-dom @types/jestNOTE
Typescript Definitions
Typescript Definitions enable Typescript to work with code written in javascript. Without them Typescript would have no way of knowing what types were in play for any javascript code.
Take this example.
function sayHello(name){ return 'hello ' + name;}There’s nothing here to tell Typescript how to “compile” this javascript. It would seem that name is a string and this function returns a string, but in plain old javascript this isn’t guaranteed and you could just as easily pass a number to sayHello and it would still concatenate “hello” and the number passed in.
In order for Typescript to check you’re passing the correct types when you invoke functions etc. it needs to know what types are valid (and which aren’t) for any given function.
To this end the Typescript compiler will attempt to locate definition files to tell it how to compile any javascript code it encounters, including javascript in third party libraries (which your project interacts with).
In this example we’re bringing in definitions for node, react, react-dom and jest which are libraries employed by Create React App.
Now rename ClientApp\src\App.js to ClientApp\src\App.tsx.
Run your app and you’ll get this error (in the browser).
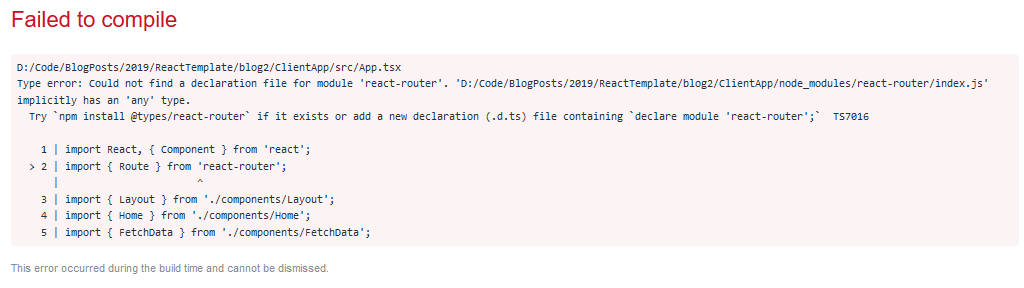
This is a good example of where missing type definitions will cause Typescsript to throw an error.
You can fix this by ensuring you’re still in the ClientApp folder then bring in the type declarations for React Router.
yarn add @types/react-routerNow run your app and everything should work exactly as before!
From here on, if you want to use Typescript for your React components just make sure to use the .tsx extension and off you go!