Add React.js to your existing asp.net application
Life is really simple, but we insist on making it complicated. Confucius
There was a time, if you wanted to make your web application a little more “responsive” and less chatty with the backend, you could just add a reference to jQuery and you’d be off and running.
Then Angular 1 came along and the same deal existed.
After that? Well things got a little more complicated.
Angular 2 brought a lot of new features to the table, and with it, a boat load more complexity.
Typescript, server-side prerendering, webpack…
If you’ve spent most of your time working with MVC/WebForms (or indeed desktop development), suddenly you’re left struggling to get a foothold.

So how do you climb the .js mountain when you’re starting at the bottom?
You can add React to your existing site#
Well one option is to party like it’s 2006 (the first release of JQuery) and get back to adding simple script references.
It’s entirely possible to add React to your existing app, in fact you can just…
Reference the react scripts#
In your existing web app, you’ll want to reference two scripts…
<script src="https://unpkg.com/react@16/umd/react.development.js" crossorigin></script><script src="https://unpkg.com/react-dom@16/umd/react-dom.development.js" crossorigin></script>These will typically go in your html <head>.
In my example ASP.NET Core app, I put this in Views/Shared/Layout.cshtml.
<head>    <meta charset="utf-8" />    <meta name="viewport" content="width=device-width, initial-scale=1.0" />    <title>@ViewData["Title"] - WebApplication1</title>
    <!-- other code here -->
    <script src="https://unpkg.com/react@16/umd/react.development.js" crossorigin></script>    <script src="https://unpkg.com/react-dom@16/umd/react-dom.development.js" crossorigin></script></head>
Now, if you add a .js file somewhere in wwwroot, you can start building up your first React component!
Here’s hello world.
var e = React.createElement;
class HelloWorld extends React.Component {    render() {        return e(            "div",            null,            "Hello World"        );    }}
const containerElement = document.getElementById('content');ReactDOM.render(e(HelloWorld), containerElement);
This probably looks a little alien if you’re new to React, but essentially we’re creating a div which will say “Hello World”.
With this HelloWorld component ready to go, we need to render it.
The last two lines find an existing #content element on your page and render the HelloWorld component into it.
Now you can reference this .js file somewhere in your application, test the page and see Hello World in all its glory.
For this example I’ll just add it to the bottom of one of the views in my app.
<h1>This is an exciting page in my existing application</h1>
<div id="content" />
<script src="~/js/hello.js"></script>
But that doesn’t look like the React I see on the Internet?!#
You’re right, it’s not.
These days, most articles about React would have a HelloWorld which looks more like this.
class HelloWorld extends React.Component {    render() {        return <div>Hello World</div>;    }}
const containerElement = document.getElementById('content');ReactDOM.render(<HelloWorld />, containerElement);
That <div></div> tag there is something called JSX.
Looks suspiciously like html right? But it’s not.
It’s actually javascript which will create an html div tag and add it to the page.
In fact, it will create the exact code we saw earlier.
React.createElement( "div", null, "Hello World");For most of us, it’s going to be easier to build components with JSX than without.
But, turning that JSX into javascript won’t happen automatically, it needs an extra step.
If you were to try and include the jsx version of your component on a page, you’d get an error.

The browser cannot interpret jsx#
JSX is not valid javascript. As a result, the browser has no idea what to do with this.
To turn…
<div>Hello World</div>;into…
React.createElement( "div", null, "Hello World");We need to use something called Babel.
Babel is a javascript compiler. Its main focus is to take “modern” javascript, written using the latest version(s) of javascript and compile it to javascript which can run in current and older browsers.
Babel is also used to turn JSX into JS.
You can try it for yourself online here. Try pasting this…
<div>Hello World</div>;…to see what the resulting javascript looks like.
Automatically turn your JSX files into JS#
Clearly you’re not going to want to take every jsx file and paste it into the Babel website to get javascript code for your site!
To automate this compilation you’ll need to download and run babel on your machine.
You’ll need a recent version of node.js installed for this to work, so grab one if you don’t already have it.
Now, with a command line open at the root of your existing web application, you need to enter a couple of commands to bring babel in to your app.
npm is the package manager for Node and provides a convenient way to bring javascript dependencies into your app.
npm init -ynpm install babel-cli@6 babel-preset-react-app@3NOTE
These dependencies are only needed for compiling JSX to js. We’re not going to be using any node packages as part of the deployed web site.
We just need to run babel during development to compile the js files.
The React scripts we included in our layout page earlier are still needed and will be used by our app to run the react components which we choose to reference from our existing views/pages.
Finally, we can run a handy little command to “keep an eye on” our jsx files, and compile them to javascript whenever they change.
npx babel --watch src --out-dir wwwroot/dist --presets react-app/prodnpx is a package runner tool which makes it easy to invoke executables contained within node packages.
Instead of typing out a full path to babel.exe (which you’d find in the node_modules in your project), you can instead type npx babel and save yourself the time and effort!
In this example, I’m telling babel to watch a folder called src and save the compiled output to wwwroot/dist.
(My example project is built using ASP.NET Core project so anything which needs serving to the browser needs to go in wwwroot).
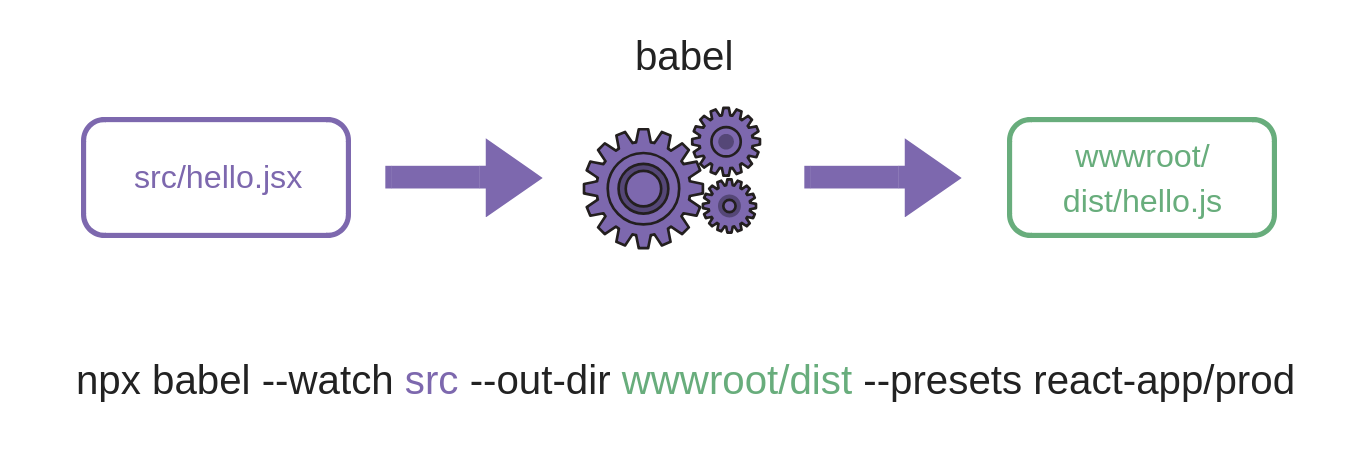
Now when I make changes to any files in src, a compiled version will appear in wwwroot/dist.

I can reference these (compiled) js files in my existing views.
<h1>This is an exciting page in my existing application</h1>
<div id="content" />
<script src="~/dist/hello.js"></script>
Summary and next steps#
You can create React components, write them using JSX and include them on your regular views/pages in your existing app.
The obvious downside to this approach is remembering to run the npx --watch command whenever you’re working on your application . You can automate that with thinks like webpack etc. however, running npx --watch will get you up and running and you can always streamline the process later.
photo credit: jim.choate59 Garden Orchard Mt Hood 7714 A via photopin (license)