Send form input via an Angular 2 component to ASP.NET Core Web API
So far we’ve set up a basic Angular 2 and .NET Core web application and made it retrieve the weather for London which is then displayed via an Angular 2 component.
However, unless all of your users live in London, you’ll want to let people choose a different city.
We’ll keep it simple for now and just present a text input field for them to type in the city name.
Pass the chosen city to Web API#
The weather component currently calls off to our web api and always requests the weather for London. We need to change this so it takes a user input.
Here’s the component as it stands before we make any changes.
export class WeatherComponent {    public weather: Weather;
    constructor(http: Http) {        http.get('/api/weather/city/London').subscribe(result => {            this.weather = result.json();        });    }}
Now change it to look like this…
export class WeatherComponent {    public weather: Weather;
    constructor(private http: Http) {    }
    public getWeather(chosenCity: string) {        this.http.get('/api/weather/city/' + chosenCity).subscribe(result => {            this.weather = result.json();        });    }}
We’ve added a getWeather function that takes in a city (as a string) and then makes an http get request to our .NET Core Web Api.
We only want to request the weather when the user enters a city so we’ve removed the initial http call from the constructor.
The constructor has one interesting addition, the private keyword. As before, we are bringing the http service into our component (so we can use it to make calls to our web api) but we’re also registering it as a private field. This ensures the getWeather function is able to access the http service via this.http.
Add a city textbox to the weather page#
It’s not much use accepting a city for our weather check if our users can’t type one in so now we turn our attention back to the component’s html template.
Time to modify weather.component.html …
<h1>Weather check</h1>
<label for="city">City</label><input type="text" id="city" [(ngModel)]="chosenCity" /><input type="button" value="Get Weather" (click)="getWeather(chosenCity)" />
<div *ngIf="weather">    <h3>Weather for {{weather.city}}</h3>
    <table class="table table-bordered table-striped">        <thead>            <tr>                <th>Temp</th>                <th>Summary</th>            </tr>        </thead>        <tbody>            <tr>                <td>{{weather.temp}}</td>                <td>{{weather.summary}}</td>            </tr>        </tbody>    </table></div>
We’ve added a regular html textbox and button.
The [(ngModel)] attribute indicates to Angular that it should bind whatever is typed into this textbox to a field called chosenCity.
By adding a (click) attribute to the button we indicate that any click of the button should call the getWeather method we defined in our weather component, passing in the chosenCity (which will always reflect the contents of the textbox).
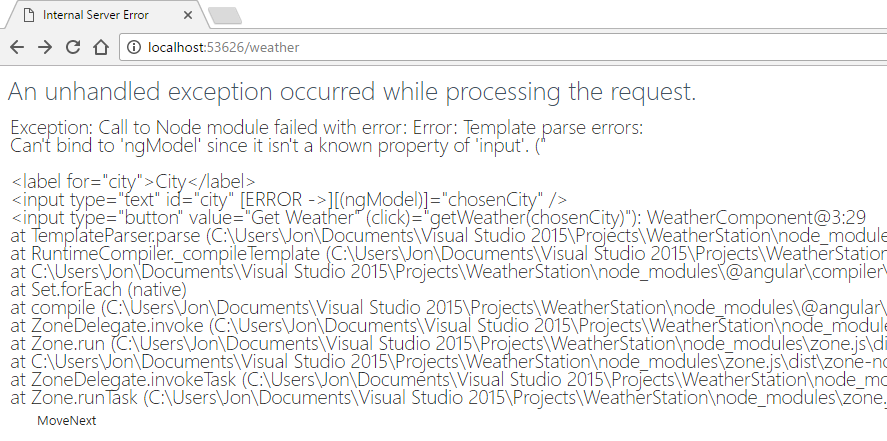
Now if you try running this you’ll get an error indicating…
Can’t bind to ‘ngModel’ since it isn’t a known property of ‘input’.

This is slightly cryptic but it turns out NgModel is part of the Angular Forms module which we haven’t included in our application yet.
Head on over to app.module.ts and make these changes.
import { NgModule } from '@angular/core';import { RouterModule } from '@angular/router';import { FormsModule } from '@angular/forms';import { UniversalModule } from 'angular2-universal';
import { AppComponent } from './components/app/app.component'import { NavMenuComponent } from './components/navmenu/navmenu.component';import { HomeComponent } from './components/home/home.component';import { FetchDataComponent } from './components/fetchdata/fetchdata.component';import { CounterComponent } from './components/counter/counter.component';import { HelloWorldComponent } from './components/helloworld/helloworld.component';import { WeatherComponent } from './components/weather/weather.component';
@NgModule({    bootstrap: [ AppComponent ],    declarations: [        AppComponent,        NavMenuComponent,        CounterComponent,        FetchDataComponent,        HomeComponent,        HelloWorldComponent,        WeatherComponent    ],    imports: [        UniversalModule, // Must be first import. This automatically imports BrowserModule, HttpModule, and JsonpModule too.        FormsModule,        RouterModule.forRoot([            { path: '', redirectTo: 'home', pathMatch: 'full' },            { path: 'home', component: HomeComponent },            { path: 'counter', component: CounterComponent },            { path: 'fetch-data', component: FetchDataComponent },            { path: 'hello', component: HelloWorldComponent },            { path: 'weather', component: WeatherComponent },            { path: '**', redirectTo: 'home' }        ])    ]})export class AppModule {}
Now try hitting your page again and everything should work as you’d expect.

Summary#
So now you know how to take user input and pass it (via an Angular 2 component) to .NET Core Web API.
If you want to take this weather app a step further, here are some ideas you could try for yourself.
- Create a more interesting (better designed) html template for our current weather component
- Display units next to the temperature (currently the ui doesn’t tell you what unit the temp is in)
- Integrate into other OpenWeather API calls (such as forecasts, not just the current weather)
- Refactor our weather API controller so the calls off to OpenWeather are made in a dedicated class (rather than the controller)
photo credit: jcburns Wacky QWERTY. via photopin (license)
All posts in Checking the weather with Angular 2 and ASP.NET Core
- Fast track your Angular 2 and .NET Core web app development
- Angular 2 and .NET Core – your first component
- Angular 2 and .NET Core – route directly to your components
- Display the weather using Angular 2 and .NET Core Web API
- Fetch the current weather using ASP.NET Core Web API and OpenWeather
- Send form input via an Angular 2 component to ASP.NET Core Web API
Struggling to figure out what to focus on with Blazor?
BlazorSharp - The .NET Web Developers community is here to help!
- Connect with your fellow .NET web developers
- Keep up to date with the latest .NET changes
- Exchange tips, tools and tactics