Display the weather using Angular 2 and .NET Core Web API
So far we’ve created a new Angular 2/.NET Core project, designed our first basic HelloWorld component and configured routing to go directly to it.
But let’s say you want to do something more interesting (and useful), you want to get some data and show it using .NET Core Web API and Angular 2.
We’ll take a look at how to create a .NET Core Web API controller, retrieve data from it and pass that up to the Angular front end (where it will be rendered as a page on your site).
Nice weather for it#
If there’s one thing we Brits are obsessed with it’s the weather, barely an hour goes by without someone commenting on it.
So let’s see if we can add a simple current weather feature to our app.
Eventually we want to prompt the user with a city input box. They can type in the name of a city, click a button and see the current weather for that city (including details like temperature).
As with all things in Angular 2, we’ll start with a component that handles all the html and business logic for this feature.
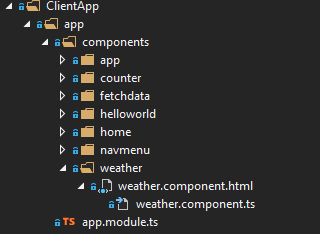
Create a Weather folder for your component and two new files.
weather.component.html
weather.component.ts

Remember Visual Studio nests files with the same filename (but different extension) together. To get to the .ts file you’ll need to expand the little arrow next to the html file.
It’s good practice to locate everything relating to a feature in a dedicated folder. That way, when you come to an app and want to see how any given part of it works, you can be pretty sure if you locate the relevant folder, you’ll find everything you need.
This is mentioned in the Angular 2 style guide where you’ll find lots of really helpful notes on building an angular 2 app that’s manageable/maintainable and able to scale.
weather.component.ts#
Open up the weather.component.ts file and add the following code.
import { Component } from '@angular/core';
@Component({    selector: 'weather',    template: require('./weather.component.html')})export class WeatherComponent {    public weather: Weather;
    constructor() {        this.weather = { temp: "12", summary: "Balmy", city: "London" };    }}
interface Weather {    temp: string;    summary: string;    city: string;}
If you compare this to our previous hello world component you’ll note the basics are the same.
There is an import statement at the top. Think of this as very similar to a using statement in C#. The import statements bring in modules that your component needs to access.
The basic properties of the component are set up in the @Component call.
After that is the actual component business logic, exported as a typescript class.
This component differs from hello world in the constructor, interface and Weather field.
First up, we need to show the weather and because we’re using Typescript we can define the structure of our weather data as an interface. That way, when we interact with an object of type Weather, we’re not left guessing what properties are on there (as we would be with traditional javascript).
We’ve also added a constructor to the component. In there we set the public field (called weather; an instance of our Weather interface) to a new object with the required fields.
Because of the typescript interface, if you try to omit any of the fields, the typescript won’t compile.
For example, this won’t compile…
constructor() { this.weather = { summary: "Balmy", city: "London" }; }Now you’ve got a fully working weather component (albeit with hardcoded data) we need to think about the user interface.
weather.component.html#
For now, let’s just show the weather in a table (using bootstrap to tidy it up slightly).
Open up your weather.component.html file and add the following markup.
<h1>Weather check</h1>
<h3>Weather for {{weather.city}}</h3>
<table class="table table-bordered table-striped">    <thead>        <tr>            <th>Temp</th>            <th>Summary</th>        </tr>    </thead>    <tbody>        <tr>            <td>{{weather.temp}}</td>            <td>{{weather.summary}}</td>        </tr>    </tbody></table>
Before you can actually use your component you need to register it in app.module.ts.
import { NgModule } from '@angular/core';import { RouterModule } from '@angular/router';import { UniversalModule } from 'angular2-universal';import { AppComponent } from './components/app/app.component'import { NavMenuComponent } from './components/navmenu/navmenu.component';import { HomeComponent } from './components/home/home.component';import { FetchDataComponent } from './components/fetchdata/fetchdata.component';import { CounterComponent } from './components/counter/counter.component';import { HelloWorldComponent } from './components/helloworld/helloworld.component';import { WeatherComponent } from './components/weather/weather.component';
@NgModule({    bootstrap: [ AppComponent ],    declarations: [        AppComponent,        NavMenuComponent,        CounterComponent,        FetchDataComponent,        HomeComponent,        HelloWorldComponent,        WeatherComponent    ],    imports: [        UniversalModule, // Must be first import. This automatically imports BrowserModule, HttpModule, and JsonpModule too.        RouterModule.forRoot([            { path: '', redirectTo: 'home', pathMatch: 'full' },            { path: 'home', component: HomeComponent },            { path: 'counter', component: CounterComponent },            { path: 'fetch-data', component: FetchDataComponent },            { path: 'hello', component: HelloWorldComponent },            { path: 'weather', component: WeatherComponent },            { path: '**', redirectTo: 'home' }        ])    ]})export class AppModule {}
As before (with our HelloWorld component), you can now access the weather component via http://yourapp/weather.

Retrieve data from Web API#
This is all well and good, but where does .NET Core Web API fit in?
Web API has one primary purpose, to serve data in response to requests. In our case, we want a service we can call with a city name, that returns the current weather for that city.
Before we think about using something more realistic than our hardcoded data, let’s try moving the existing hardcoded data down into a Web API controller. That way we can hook our Angular 2 component up to it and make sure everything still works.
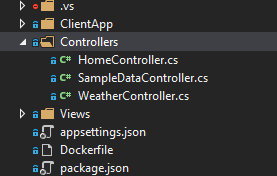
You should find a Controllers folder in your solution. Open that up and add a new class called WeatherController.

Let’s modify WeatherController.cs to return our hardcoded weather data.
using Microsoft.AspNetCore.Mvc;
namespace WeatherChecker.Controllers{    [Route("api/[controller]")]    public class WeatherController : Controller    {        [HttpGet("[action]/{city}")]        public IActionResult City(string city)        {            return Ok(new { Temp = "12", Summary = "Barmy", City = city });        }    }}
The attribute routing is set up so that this controller will handle urls that start with api/Weather (.net core substitutes the [controller] tag with the name of the controller).
The attribute on the City method indicates that any request to /city/somecity is directed here.
Putting that together, this url would be handled by our City method.
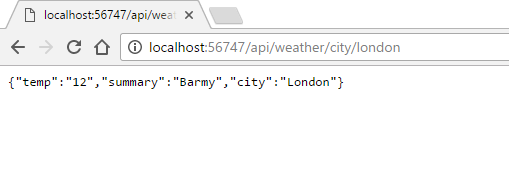
http://yoursite/api/weather/city/london
Before you go any further, try that out for yourself by compiling and running your site, then navigating to /api/weather/city/london.

Let the weather component have its data#
Now we’ve got hardcoded data in two places; the angular weather component and our new web api controller, so let’s change the weather component to retrieve the data from our Weather API Controller instead of using its own hardcoded data.
Change weather.component.ts so it looks like the following.
import { Component } from '@angular/core';import { Http } from '@angular/http';
@Component({    selector: 'weather',    template: require('./weather.component.html')})export class WeatherComponent {    public weather: Weather;
    constructor(http: Http) {        http.get('/api/weather/city/London').subscribe(result => {            this.weather = result.json();        });    }}
interface Weather {    temp: string;    summary: string;    city: string;}
We’ve imported another module (angular http) which lets us make calls to a backend service.
The hardcoded data is gone from the constructor which now brings the http dependency into our component and then makes a call to our city weather api.
If you’re used to lambdas in C# this will look familiar. The results of that call are then handled in an anonymous method which sets our weather field to the json value that is returned from the call to our weather API.
Hooray, our hardcoded data is gone from the Angular 2 controller and is coming instead from our .NET Core Web API controller.
Try it out though and you’ll get a nasty shock.
No weather for you#
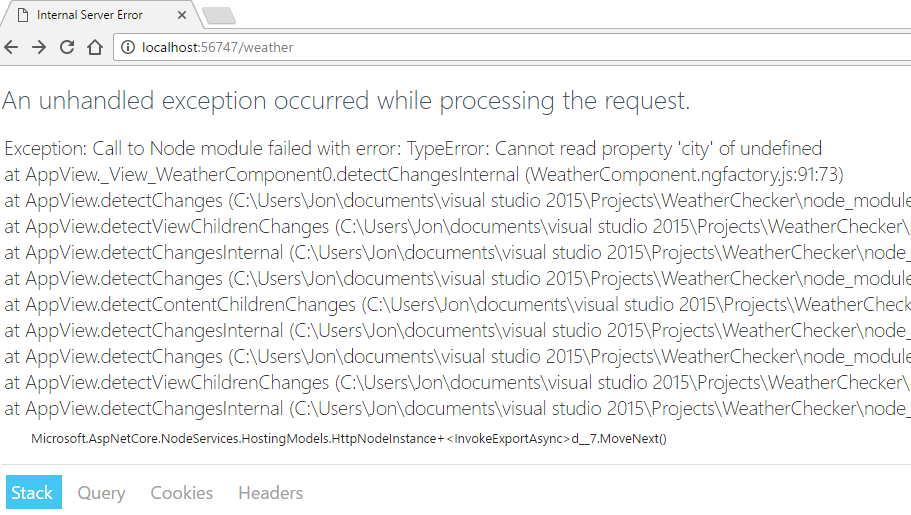
Hitting the weather page results in this error.

So what’s going on?
When your weather component loads, Angular starts the http call off to your backend server, but whilst it’s waiting for results it’s already trying to render your user interface.
Your html has a binding to weather.city.
<h3>Weather for {{weather.city}}</h3>Angular attempts to access the city property of the weather field (in order to display it). Remember our weather field? here’s what it looks like.
export class WeatherComponent { public weather: Weather;The weather field remains undefined until the http call comes back. Only when the API call completes will the resulting data be assigned to it.
You can fix this by adding an if statement to your markup to only render if weather is defined.
<h1>Weather check</h1>
<div *ngIf="weather">    <h3>Weather for {{weather.city}}</h3>
    <table class="table table-bordered table-striped">        <thead>            <tr>                <th>Temp</th>                <th>Summary</th>            </tr>        </thead>        <tbody>            <tr>                <td>{{weather.temp}}</td>                <td>{{weather.summary}}</td>            </tr>        </tbody>    </table></div>
We’ve wrapped our existing html in a div and added an ngIf attribute to it. If the weather field is undefined, this will evaluate to false and angular will not attempt to render the div or its markup.
Test this out again and you’ll have your weather data.
Summary and next steps#
So we’ve got data showing on our weather page but we’ve still got a few things to do.
First up, we need to get real data (instead of using our hardcoded values). For that we’ll make our Web API controller retrieve its data from the OpenWeather API service.
Finally we’ll want to give the user a way of choosing which city they want to see the weather for.
photo credit: Thomas James Caldwell Rainbow Over Bryce via photopin (license)
All posts in Checking the weather with Angular 2 and ASP.NET Core
- Fast track your Angular 2 and .NET Core web app development
- Angular 2 and .NET Core – your first component
- Angular 2 and .NET Core – route directly to your components
- Display the weather using Angular 2 and .NET Core Web API
- Fetch the current weather using ASP.NET Core Web API and OpenWeather
- Send form input via an Angular 2 component to ASP.NET Core Web API
Struggling to figure out what to focus on with Blazor?
BlazorSharp - The .NET Web Developers community is here to help!
- Connect with your fellow .NET web developers
- Keep up to date with the latest .NET changes
- Exchange tips, tools and tactics