Angular 2 and .NET Core – your first component
Now you’ve taken the quick route to getting an Angular 2 and .NET Core app up and running, what have you actually got?
If you haven’t already, hit CTRL-F5 and take a quick look around the app.
The home page tells you a little bit about the underlying technology used in the template whilst the other two pages show some basic example functionality (an incrementing counter and demo of fetching data from the back-end).

Perhaps more interesting, is what’s going on under the hood.
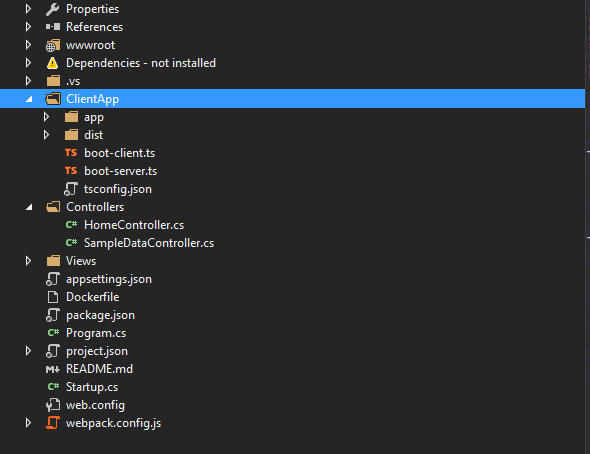
Here’s the solution.

ClientApp#
This is where the fun starts. All your Angular 2 code will go here.
If you take a quick look in there now you’ll find a components folder inside the app folder.
Angular 2 is built on the concept of components.
Every bit of functionality you build into your app can be built as a component that can take inputs, provide outputs and be rendered at multiple places in your app.
Components, components everywhere#
Everything is a component, including the App itself so you’ll notice an app component alongside counter, fetchdata, home and the navmenu.

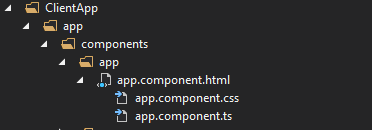
If you take a look at the app component you’ll see it consists of three files containing html, css and typescript.

Visual Studio shows these three files together, with the typescript and css files nested below the html one. If you rename one, VS will automatically rename the other two.
The app.component.html template uses bootstrap and acts as the main structure for the entire web app. Every other component will be rendered somewhere within this html.
<div class='container-fluid'> <div class='row'> <div class='col-sm-3'> <nav-menu></nav-menu> </div> <div class='col-sm-9 body-content'> <router-outlet></router-outlet> </div> </div></div>The nav-menu component is rendered in a div whose size is determined by the bootstrap grid system (col-sm-3 in this case).
Every Angular 2 component can be included in your app using a custom selector which you specify when you create the component. In this case the nav menu has a selector of “nav-menu”.
The template also uses the special router-outlet selector which taps into the angular routing engine. Whenever an angular 2 route is accessed, the relevant html for that route will be rendered in place of this router-outlet selector. More on routing later.
Now take a look at the app.component.ts.
import { Component } from '@angular/core';
@Component({    selector: 'app',    template: require('./app.component.html'),    styles: [require('./app.component.css')]})export class AppComponent {}
This is about as simple as an Angular 2 component gets.
You can see that the component uses the app.component.html file for its template and the app.component.css file for styles.
By exporting the AppComponent class you ensure you will be able to access it elsewhere in your Angular 2 application.
Enough chat, create your first component#
That’s more than enough background info for now. On to your first component.
We’ll keep it simple; add a Hello World component, hook it up to the Angular app and display it on the home page.
Start by creating a new HelloWorld folder inside the app/components folder.
Now add a new helloworld.component.ts file to it.

Whilst you’re here, add a new helloworld.component.html file as well.
Here’s what you should end up with.

Now replace the contents of helloworld.component.ts with this…
import { Component } from '@angular/core';
@Component({    selector: 'helloworld',    template: require('./helloworld.component.html')})export class HelloWorldComponent {}
You’re saying that this new hello world component can be included on a page using the helloworld selector and will load the helloworld.component.html template.
Update the helloworld.component.html so it looks like this…
<div class="panel panel-info"> <div class="panel-heading"> Hello World </div> <div class="panel-body"> Here's some text to get us started.... </div></div>This uses a bootstrap panel to make our “hello world” content look vaguely presentable.
To actually see the results of your hard work you’ll need to take a few more steps.
First up, your Angular 2 application won’t recognise your component until you register it in app.module.ts.
You need to import the component into the app.module.ts typescript file. Then you need to add it to the list of declared components (so Angular knows it exists and can make it available in your app).
import { NgModule } from '@angular/core';import { RouterModule } from '@angular/router';import { UniversalModule } from 'angular2-universal';import { AppComponent } from './components/app/app.component'import { NavMenuComponent } from './components/navmenu/navmenu.component';import { HomeComponent } from './components/home/home.component';import { FetchDataComponent } from './components/fetchdata/fetchdata.component';import { CounterComponent } from './components/counter/counter.component';import { HelloWorldComponent } from './components/helloworld/helloworld.component';
@NgModule({    bootstrap: [ AppComponent ],    declarations: [        AppComponent,        NavMenuComponent,        CounterComponent,        FetchDataComponent,        HomeComponent,        HelloWorldComponent    ],    imports: [        UniversalModule,        RouterModule.forRoot([            { path: '', redirectTo: 'home', pathMatch: 'full' },            { path: 'home', component: HomeComponent },            { path: 'counter', component: CounterComponent },            { path: 'fetch-data', component: FetchDataComponent },            { path: '**', redirectTo: 'home' }        ])    ]})export class AppModule {}
Now you can use your component as many times as you like in your app.
For now (and to keep things simple), open up the home.component.html file and bring in your hello world component like so.
<h1>Hello, world!</h1>
<helloworld></helloworld>
<p>Welcome to your new single-page application, built with:</p><ul>    <li><a href='https://get.asp.net/'>ASP.NET Core</a> and <a href='https://msdn.microsoft.com/en-us/library/67ef8sbd.aspx'>C#</a> for cross-platform server-side code</li>    <li><a href='https://angular.io/'>Angular 2</a> and <a href='http://www.typescriptlang.org/'>TypeScript</a> for client-side code</li>    <li><a href='https://webpack.github.io/'>Webpack</a> for building and bundling client-side resources</li>    <li><a href='http://getbootstrap.com/'>Bootstrap</a> for layout and styling</li></ul><p>To help you get started, we've also set up:</p>// -- rest of page
Hit CTRL-F5 and marvel at your Hello World component in all its glory.
Next time we’ll take a look at routing in Angular 2, and then pulling data back from .NET Core via Web API.
photo credit: Leo-setä My computer, R.I.P. via photopin (license)
All posts in Checking the weather with Angular 2 and ASP.NET Core
- Fast track your Angular 2 and .NET Core web app development
- Angular 2 and .NET Core – your first component
- Angular 2 and .NET Core – route directly to your components
- Display the weather using Angular 2 and .NET Core Web API
- Fetch the current weather using ASP.NET Core Web API and OpenWeather
- Send form input via an Angular 2 component to ASP.NET Core Web API
Struggling to figure out what to focus on with Blazor?
BlazorSharp - The .NET Web Developers community is here to help!
- Connect with your fellow .NET web developers
- Keep up to date with the latest .NET changes
- Exchange tips, tools and tactics