Blazor by Example - Build a simple traffic light
There’s no better way to learn Blazor than by practicing with small features/components.
With that in mind, let’s build a simple traffic light component and explore how Blazor’s model binding works…
The requirement#
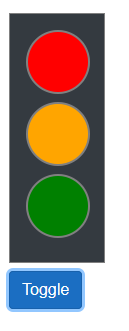
We want to display a simple traffic light which operates according to UK traffic light logic, something like this:
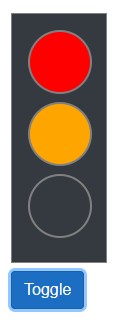
A UK traffic light progresses through these states:
- Stop (red)
- Get ready to go (red and amber)
- Go (green)
- Get ready to stop (amber)
Rinse and repeat.
Build it in Blazor (simplest possible version)#
For this we’ll adopt the TDD style approach of Red, Green, Refactor (see what I did there!)
We’re not actually writing tests, but we’ll take the approach of getting something up and running using the simplest possible approach, before refactoring where we see fit.
Bear in mind, there are many many ways to tackle a requirement like this, with no “right” or “wrong” answers. So let’s have a go, let the code tell us when we need to refactor, and see where we end up.
All Blazor components are essentially made up of three parts.
- Markup (essentially HTML, but using Razor syntax)
- CSS
- Component logic (C#)
Here’s the markup we’ll start with:
TrafficLight.razor
@page "/trafficlight"@inherits TrafficLightBase
<div class="row">    <div class="lights">        <div class="red @(RedOn ? "on" : "off")"></div>        <div class="amber @(AmberOn ? "on" : "off")"></div>        <div class="green @(GreenOn ? "on" : "off")"></div>    </div></div>
<div class="row pt-2">    <button @onclick="@Toggle" class="btn btn-primary">        Toggle    </button></div>
This Blazor component inherits a razor component base class (we’ll see that in a moment).
Then we have a few divs to represent the traffic light itself and a button to manually toggle the light between its possible states.
Each traffic light (red, amber, green) in our markup has a css class attribute which includes a conditional operator pointing to a boolean field to determine whether that light is “on” or “off”.
<div class="red @(RedOn ? "on" : "off")"></div>In the example above, if the boolean field RedOn is true, then our div will have the css class on otherwise it will have the class off.
Now we need a little CSS to pull this together, I added this to wwwroot/css/site.css.
.lights {    padding: 1em;    border: 1px solid grey;    width: 6em;    background-color: #343a40;}
.lights div {    margin-bottom: 0.5em;    border: 2px solid grey;    width: 4em;    height: 4em;    border-radius: 50%;}
div.red.on {    background-color:  red;}
div.amber.on {    background-color:  orange;}
div.green.on {    background-color:  green;}
Before we can test this we need to create that base class I mentioned:
TrafficLight.razor.cs
using Microsoft.AspNetCore.Components;
namespace TrafficLightExample.Pages{    public class TrafficLightBase : ComponentBase    {        public bool RedOn { get; set; }        public bool AmberOn { get; set; }        public bool GreenOn { get; set; }
        public void Toggle()        {            RedOn = true;            AmberOn = true;            GreenOn = true;        }    }}
So we have a few booleans to represent the state of each light, and a toggle method which simply switches all the lights on (for now, so we can see it working).
Run this now, click the button and all the lights should come on!
Add the various states#
Our traffic light “works”; now to make it move through the different possible states each time we press the toggle button.
If we’re going to stick to our guns and do the “simplest” possible thing to get this working, we’ll probably want to use some conditional logic to figure out what state we’re in and switch on the relevant lights accordingly…
To do this we’ll need to know the current state of the lights, which state to move on to (the next state) and then figure out which lights to turn on for that new state.
Let’s break this down into stages, first of all the transitions between states…
First up, we could probably use an enum to identify the various states available to us…
public enum State{ Stop, GetReadyToGo, Go, GetReadyToStop}Incidentally, I placed this next to my TrafficLightBase class in the same .cs file; it might eventually move somewhere else but nothing slows development more than trying to name things or figure out where to put them!
Now we’ll want to do two things;
- Store the current state of our lights
- Change the current state to the next applicable state each time we click the
Togglebutton
Let’s give it a go.
 public class TrafficLightBase : ComponentBase{    public bool RedOn { get; set; }    public bool AmberOn { get; set; }    public bool GreenOn { get; set; }
    private State _currentState = State.Stop;
    public void Toggle()    {        _currentState = _currentState switch        {            State.Stop => State.GetReadyToGo,            State.GetReadyToGo => State.Go,            State.Go => State.GetReadyToStop,            State.GetReadyToStop => State.Stop,            _ => _currentState        };
        RedOn = true;        AmberOn = true;        GreenOn = true;    }}
The switch statement here is using the new C# switch expression syntax. If you haven’t seen it before it can be a tad confusing but essentially the code left of the lambda is the condition, and the code right of the lambda is the value that will be returned.
State.GetReadyToGo => State.Go,So in this case we’re saying, if _currentState equals State.GetReadyToGo, then the result of our switch call will be State.Go which we then assign to _currentState, thereby moving our state on (according to the rules of UK traffic lights!)
But now we face the second half of our problem, how to turn on the correct lights for this new state?
Well we may as well stick to our guns and introduce a second switch for this as well:
 public void Toggle(){    _currentState = _currentState switch    {        State.Stop => State.GetReadyToGo,        State.GetReadyToGo => State.Go,        State.Go => State.GetReadyToStop,        State.GetReadyToStop => State.Stop,        _ => _currentState    };
    switch (_currentState)    {        case State.Stop:            RedOn = true;            AmberOn = false;            GreenOn = false;            break;        case State.GetReadyToGo:            RedOn = true;            AmberOn = true;            GreenOn = false;            break;        case State.Go:            RedOn = false;            AmberOn = false;            GreenOn = true;            break;        case State.GetReadyToStop:            RedOn = false;            AmberOn = true;            GreenOn = false;            break;    }}
It’s not pretty, but it works…
This time we’ve used a standard switch statement to determine what state we’re in and set the various booleans accordingly…
Note that we can’t use switch expressions for this second switch at the moment.
Switch expressions work when you want to return a single value but in this case we’re performing multiple actions.
Run this now and you’ll notice a slightly strange effect.
The toggle button does work, moving the lights on between their states, but when you first load the page the red light isn’t shown.
Can you see why in the code we’ve written?
Although we’re setting _currentState to State.Stop when we load our component, we’re not running the code to work out which lights to switch on until we click our Toggle button.
We could try and fix that now, but I suspect our next refactor will address this anyway so we’ll note it down and press on.
Refactor the traffic light state into an object#
Looking at this again, the traffic light state (which lights are on or off) feels like a key concept in our application.
We’re currently storing three separate boolean primitives to represent this state, but note how we always change them together…
RedOn = false; AmberOn = true; GreenOn = false;The code as it stands doesn’t gives us much context about what those booleans represent, or any opportunity to change them in a single operation.
NOTE
Primitive obsession
The “smell” we’re talking about here is sometimes referred to as primitive obsession.
By way of example, have you ever passed DateTime primitives into a method when you want to express a start and end date range for something?
public GenerateReport(DateTime from, DateTime to)If you look at that method signature, the two dates are being passed in separately, and apart from their name could really represent anything.
Consider what it looks like when you call this code…
GenerateReport(new DateTime(2012-01-01), new DateTime(2012-01-02))There’s really nothing to tell us what those dates represent.
Until we go and check the names of the parameters in our method, these dates could refer to anything.
What we’re really representing is a date range, so why not create an object which explicitly represents this concept and pass that instead?
public GenerateReport(DateRange dateRange)Now when we call this method we have to provide a valid date range…
GenerateReport(new DateRange(2012-01-01, 2012-01-02))It’s blindingly obvious what that represents, and we can implement code in the constructor of DateRange to ensure the range is valid (the dates are not null, are in the correct order etc.)
Let’s refactor our state into one object; create a new class called TrafficLightState
public class TrafficLightState{    public bool RedOn { get; }    public bool AmberOn { get; }    public bool GreenOn { get; }
    public TrafficLightState(bool redOn, bool amberOn, bool greenOn)    {        RedOn = redOn;        AmberOn = amberOn;        GreenOn = greenOn;    }}
Now we are free to create instances of this state (with the correct lights switched on) and pass them around as needed.
But what shall we do with our switch which controls this state? Here’s how it stands in our component’s Toggle method:
switch (_currentState){ case State.Stop: RedOn = true; AmberOn = false; GreenOn = false; break; case State.GetReadyToGo: RedOn = true; AmberOn = true; GreenOn = false; break; case State.Go: RedOn = false; AmberOn = false; GreenOn = true; break; case State.GetReadyToStop: RedOn = false; AmberOn = true; GreenOn = false; break;}Rather than assign three booleans, we want to somehow get an instance of TrafficLightState with the correct lights turned on for any given state. We can then use this state object and bind our component to it.
One way would be to remove the switch(_currentState) statement from our component and add a similar one in a static method on TrafficLightState itself, let’s try that…
TrafficLightState
public static TrafficLightState Resolve(State state){ switch (state) { case State.Stop: return new TrafficLightState(true, false, false) case State.GetReadyToGo: return new TrafficLightState(true, true, false) case State.Go: return new TrafficLightState(false, false, true) case State.GetReadyToStop: return new TrafficLightState(true, false, false) default: return new TrafficLightState(true, false, false); }}Now when we can call TrafficLightState.Resolve and pass in the current state, we’ll get back a new instance of TrafficLightState with the correct lights turned on.
Resolve is now effectively a factory method, creating new instances of our traffic light state as needed.
And if we want to, we can even change the switch statement to a switch expression!
return state switch{ State.Stop => new TrafficLightState(true, false, false), State.GetReadyToGo => new TrafficLightState(true, true, false), State.Go => new TrafficLightState(false, false, true), State.GetReadyToStop => new TrafficLightState(false, true, false), _ => new TrafficLightState(true, false, false)};Either way, we can use it thus:
TrafficLightState.Resolve(<state>)With this in place, our traffic light component base code can be simplified considerably…
public class TrafficLightBase : ComponentBase{    private State _currentState = State.Stop;    protected TrafficLightState Lights =>        TrafficLightState.Resolve(_currentState);
    public void Toggle()    {        _currentState = _currentState switch        {            State.Stop => State.GetReadyToGo,            State.GetReadyToGo => State.Go,            State.Go => State.GetReadyToStop,            State.GetReadyToStop => State.Stop,            _ => _currentState        };    }}
Before this will work we just need to update our markup to bind to this Lights property.
<div class="row"> <div class="lights"> <div class="red @(Lights.RedOn ? "on" : "off")"></div> <div class="amber @(Lights.AmberOn ? "on" : "off")"></div> <div class="green @(Lights.GreenOn ? "on" : "off")"></div> </div></div>When the component renders it will attempt to retrieve the value of the Lights property, which will invoke TrafficLightState.Resolve passing in the current state (State.Stop by default).
When we click the Toggle button we’ll update _currentState to the next applicable state, at which point the component will be re-rendered, picking up a new value for Lights and updating the UI accordingly.
Next Steps#
Now we’ve got this far it’s interesting to note the amount of Blazor magickery here is limited. Apart from binding the markup to the model, everything else is figuring out the UI logic (and expressing it in C#).
Of course, as a C# developer, the joy is that you are writing C# (not javascript) and can bring your existing knowledge, skills and experience to the party!
As for the traffic light, it now works, and our Blazor component is pretty small.
But something is bugging me about that enum.
I think it’s because the enum feels very separate to the state object we’ve created. It would be nice if we didn’t have to store a property with the current enum value in it at all, as this gives us something else to track in addition to our current instance of the TrafficLightState object itself.
Next time we’ll have a go at refactoring the enum out and see where we end up.
In the meantime, here’s the complete source for the example as it currently stands…