How to accept Stripe payments via Blazor in .NET 8
One of the promises of .NET 8 is that it opens the door to using Blazor for new categories of web application.
One such example is a product landing page.
Landing pages need to load fast and play nicely with SEO.
That pretty much rules out Blazor WASM with its large initial download and lack of SEO support.
Equally, Blazor Server seems like overkill, what with its need to keep an open socket connection (and that lost connection error).
But wait! Before you run off to use Razor Pages, MVC, or static HTML instead…
.NET 8 brings a new* way to render your Blazor components - via static server-side rendering.
NOTE
*.NET 8 simplifies the options for rendering components statically on the server, and makes it the default option ‘out of the box’ when you spin up a new Blazor web app.
But this support does already exist in a slightly different form in .NET prior to version 8.
It’s been possible to pre-render Blazor components on the server for a while now.
.NET 8 streamlines that process and make it much more accessible (and intuitive to use).
It also makes brings significant improvements to how you can take user input via forms, and brings new features like streaming rendering and auto-switching between Blazor Server and WASM.
We’ll use Stripe to take payments via our Blazor app.
Stripe is a popular way to take payments online.
It recently expanded its range of payment methods and now supports PayPal, Apple Pay, Google Pay, and a whole host of other options.
It also boasts a number of developer-friendly APIs and with robust webhook support it’s a pretty solid choice for taking payments online.
Make sure you’ve got a Stripe account#
It probably goes without saying but you’ll need a Stripe account to make this work.
Head to https://dashboard.stripe.com/register to get started.
Once you’re logged in, make sure to click the toggle to switch into Test mode.
Here you can be sure you’re only interacting with test data (and can test everything using dummy credit card numbers).
Measure twice, cut once#
It pays to plan these things out…
To integrate payments into our app we need two things:
- A way to present a checkout form (to capture user information, payment details etc.)
- A mechanism to fulfil the resulting order
Stripe has a mechanism whereby you can create a checkout session, then redirect users to it.
In this scenario Stripe hosts the checkout, which is generally the simplest way to start taking payments online.
It is technically possible to host your own Stripe checkout, but we’ll save that for another day :)
Let’s start with a button that will initiate our checkout session.
Home.razor
@page "/"
<PageTitle>Widget Sale!</PageTitle>
<section class="border p-4 bg-light">    <h2>£49</h2>    <p>While stocks last!</p>    <button type="submit" class="btn btn-primary">        Place Order    </button></section>
Currently this button won’t do anything.
To make it spring into life we need to wrap the button in a form.
Home.razor
...
<section class="border p-4 bg-light">    <h2>£49</h2>    <p>While stocks last!</p>
    <form method="post" @formname="checkout" @onsubmit="Checkout">        <button type="submit" class="btn btn-primary">            Place Order        </button>        <AntiforgeryToken />    </form>
</section>
@code {
private void Checkout() { Console.WriteLine("checking out!"); }
}This uses the new @formname directive in .NET 8 to route incoming form posts ‘back’ to the correct component.
onSubmit directs .NET to execute the Checkout method when the form is submitted.
We render an instance of the new AntiforgeryToken component to ensure the incoming form POST originated on our site.
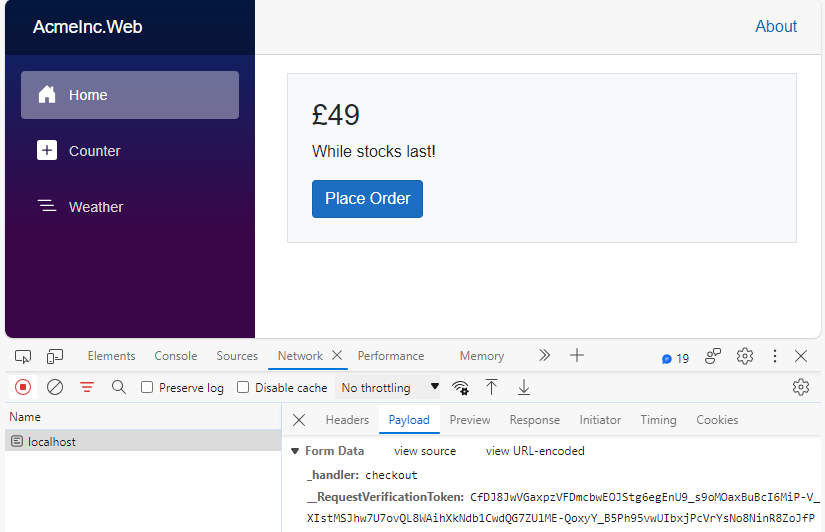
View the source code for your page in the browser at this point and you’ll see a form that looks something like this:
<form method="post"> <input type="hidden" name="_handler" value="checkout"> <button type="submit" class="btn btn-primary"> Place Order </button> <input type="hidden" name="__RequestVerificationToken" value="<random_looking_token_here>"></form>Submit the form and you’ll see a standard form POST in the browser’s dev tools (and the message “checking out!” in the server’s console logs).
NOTE
Note the difference here, compared to Blazor WASM and/or Blazor Server.
Where those hosting models enable you to directly wire up a handler to a button - here this component is being rendered statically on the server.
Which means we need to use the more traditional method of handling form POST requests to initiate this checkout process.
That’s a good fit in this case as the checkout needs to be initiated on the server, using our secret Stripe key, which should NOT be shared publicly.
Now to wire it up to Stripe#
Now we need to interact with Stripe to create a checkout session.
First you’ll want to add a product to Stripe.
Make sure you’re still in Test mode in the Stripe dashboard, then head to Product Catalogue and click Add product to set one up.
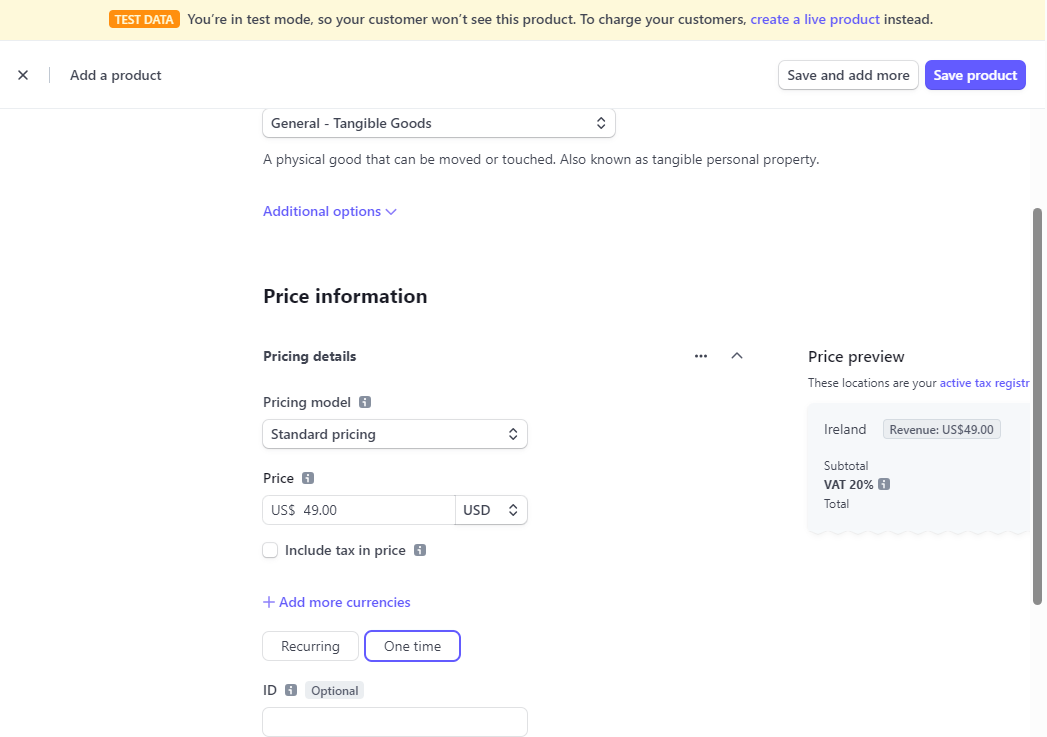
Once you’ve done that, you’ll see a price with a price API ID. Copy that - you’ll need it in a moment.
Now to add the Stripe.net package to your project.
dotnet add package Stripe.netTo interact with the Stripe API you need a key.
You can get this using the Developers link on the Stripe dashboard.
Make sure you’re still in Test mode and copy the Secret key from Developers/API keys.
One easy way to set the key for all Stripe interactions is via Program.cs.
...
StripeConfiguration.ApiKey = app.Configuration.GetValue<string>("StripeAPIKey");
...
This assumes you’ll store the key in config.
NOTE
On my machine I use .NET User Secrets to avoid storing any real keys in the source code for the app.
With that in place we can go ahead and modify Checkout method to create (and redirect to) a new checkout session.
We’ll need to add a using statement for Stripe.Checkout and inject an instance of NavigationManager
Home.razor
@page "/"@using Stripe.Checkout@inject NavigationManager NavMan
...
Then update the Checkout method to run async and create the checkout session.
@code {
    private async Task Checkout()    {        var domain = "http://localhost:5095";        var options = new SessionCreateOptions        {            LineItems = new List<SessionLineItemOptions>            {                new()                {                    // Provide the exact Price ID (for example, price_1234) of the product you want to sell                    Price = "price_1234",                    Quantity = 1,                },            },            Mode = "payment",            SuccessUrl = domain + "/OrderComplete",            CancelUrl = domain + "/OrderAbandoned"        };        var service = new SessionService();        var session = await service.CreateAsync(options);        NavMan.NavigateTo(session.Url);    }
}
Replace price_1234 with the product code you copied earlier.
The domain needs to point to the address where your web app is running.
NOTE
During development this is likely to be a localhost address.
In production it will be wherever your app is deployed.
The simplest way to specify different domains depending on the environment is via a configuration value:
var domain = Config.GetValue<string>("Domain");Finally, we need to create the pages we configured Stripe to redirect to when checkout succeeds or is cancelled.
Components/Pages/OrderComplete.razor
@page "/OrderComplete"
<h2>Order Complete</h2><p>Got it, thanks!</p>
Components/Pages/OrderAbandoned.razor
@page "/OrderAbandoned"
<h2>Order Cancelled</h2><p>You have not been charged</p>
And that’s it. Now when you run this and click the buy button you should be redirected to the Stripe checkout page.
Fill in some random details (you can use this Stripe test card), hit Pay and you should be redirected back to your app and the OrderComplete page.
Fulfil the order#
Chances are you need to run some code to fulfil the order when it’s placed.
You could technically do this in the OrderComplete page but that’s not a reliable place to run key business logic.
What if the user never makes it to that page, or hits refresh and views the same page twice?
A more reliable option is to use webhooks.
With webhooks you tell Stripe where to send the details of any orders that are placed.
Your code can then handle those incoming webhooks and return a 200 OK status code when the necessary steps have been taken.
If you return an error status code (or Stripe can’t reach your webhook) it will automatically try again a number of times before eventually giving up.
To implement the webhook endpoint we can use a standard controller or minimal API endpoint.
Controllers/StripeWebHookController.cs
[Route("api/stripehooks")]public class StripeWebHook : Controller{    private readonly IConfiguration _configuration;
    public StripeWebHook(IConfiguration configuration)    {        _configuration = configuration;    }
    [HttpPost]    public async Task<IActionResult> Index()    {        var json = await new StreamReader(HttpContext.Request.Body).ReadToEndAsync();        var secret = _configuration.GetValue<string>("StripeWebHookSecret");
        try        {            var stripeEvent = EventUtility.ConstructEvent(                json,                Request.Headers["Stripe-Signature"],                secret            );
            // Handle the checkout.session.completed event            if (stripeEvent.Type == Events.CheckoutSessionCompleted)            {                var session = stripeEvent.Data.Object as Session;                var options = new SessionGetOptions();                options.AddExpand("line_items");
                var service = new SessionService();                // Retrieve the session. If you require line items in the response, you may include them by expanding line_items.                var sessionWithLineItems = await service.GetAsync(session.Id, options);                StripeList<LineItem> lineItems = sessionWithLineItems.LineItems;
                // do something here based on the order's line items!            }
            return Ok();        }        catch (StripeException e)        {            return BadRequest();        }    }}
This depends on you setting a value for the StripeWebHookSecret in your config.
You can get that secret using Stripe’s handy mechanism for testing webhook endpoints locally.
If you check you’re still in Test mode in the dashboard, then head to Developers > Webhooks you should see something like this:

Click Test in a local environment and you’ll see some instructions to set up webhook forwarding to your local machine.
Follow those instructions with your app running locally and you’ll be able to check your controller action fires when you test your checkout process.
For production you’ll want to click Add an endpoint and create an endpoint which points to the production URL where this controller action will reside.
You can then get the production value for StripeWebHookSecret from Stripe’s dashboard.
In Summary#
Stripe is a reliable platform for handling online payments.
With Blazor in .NET 8 we can integrate Stripe checkout in a single component (using static server-side rendering and the new model-binding options for posted form data).
To fulfil the order, we can lean on another part of ASP.NET - controllers and/or Minimal APIs to read and process the incoming order details.
Your skills aren't becoming obsolete. They're becoming essential.
Practical engineering principles for building software that works - with or without AI.