Secure your ASP.NET Core MVC and Web API app using Google
Last time we took a look at the big picture when it comes to authentication/authorization for your ASP.NET Core app.
Now it’s time to tackle a common scenario – securing your .NET Core Web app (even when accessed via Angular).
To keep things simple for this example, we’re going to require our users to log in as soon as they enter our app.
We can use ASP.NET Core to redirect the user to a login page as soon as they hit our default controller action (/home/index).
That way, they can’t even load our Angular app until they’re logged in.
Once they’ve logged in (via Google), Angular will load as normal and any requests from the Angular app to our Web API will work.
The end result#
Let’s start by looking at the end result.
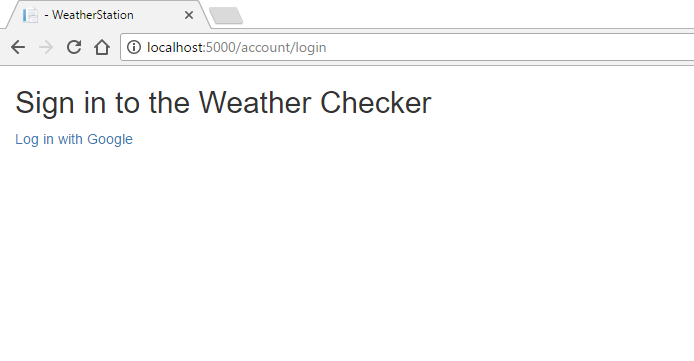
When we’ve made the changes to our app, any users attempting to access it will be redirected to this amazing login page.

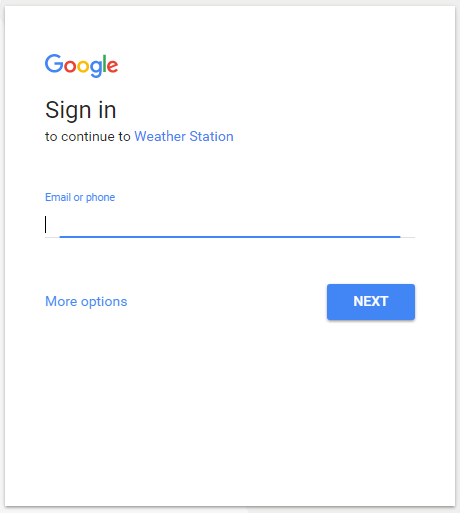
We’re not going to win any prizes for design here but it will get us up and running. When your user clicks the Log in with Google link, they’ll be redirected to Google for authentication.

Once they’ve confirmed their email and password, they’ll be redirected back to your application, along with tokens confirming they have been authenticated.
ASP.NET Core will then accept those tokens as proof of identity and check for them on every request to a secure part of your app.
Sample App#
To save spinning up yet another sample app, I’m going to use my Angular 2 Weather Station for this.
However, any ASP.NET Core MVC app will suffice.
If you don’t already have one and want to spin up a new app to play along, this should work…
dotnet new --install Microsoft.AspNetCore.SpaTemplates::*dotnet new angularGoogle – for all your authorization needs#
As we covered in our look at big picture, you need an Authorization server. The Auth server takes care of requesting user credentials, confirming they are who they claim to be, then redirecting them back to your application with an access token.
To save ourselves the hassle of creating our own login system for now, we’re going to use Google as our Authorization Server (using OAuth2 and OpenId Connect).
What in the world is OAuth 2 and OpenId Connect?#
OK, I’ll level with you.
When I started putting together this article, I fully intended to use OAuth 2 by itself.
If you’re not familiar with it, OAuth 2 is a means by which you can request an authorization key for your app via a third party e.g. Google.
The thing is though, it was never really designed for true user authentication.
If you think back to our house analogy from the big picture. OAuth 2 will give users a key to your house, but once they have a key, there’s no longer any guarantee that they are who they claim to be. They could have given that key to anyone who can now do what they like in your house!
Also, there are no strict rules on how OAuth2 should be implemented. The big providers like Google and Facebook started encouraging sites to use it for pseudo Authentication, hence “Login with Google” buttons appearing everywhere. But OAuth2 by itself is pretty weak for Authentication and there have been a number of significant holes found in it over the last few years.
This is where OpenId Connect comes in. This sits on top of OAuth 2 and effectively turns it into the secure authentication framework you really want it to be.
Using OpenId Connect, you can be much more sure that the person holding the key to your web app is the person they claim to be.
The good news is, setting up OpenId Connect in ASP.NET Core is pretty straightforward and definitely worth it for the extra security it provides.
Set up your app in Google#
The first step is to head on over to Google to set up the OAuth 2.0 side of things.
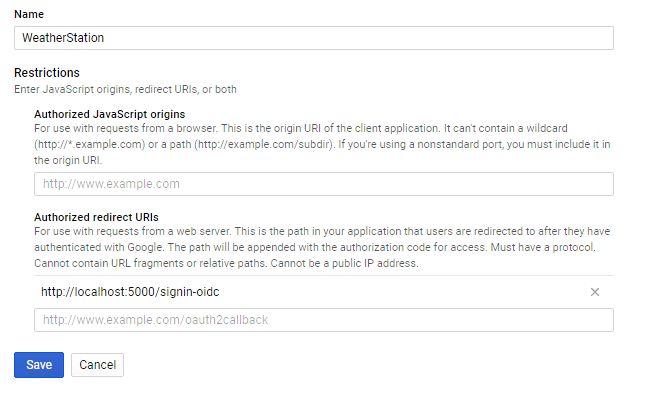
You’ll need to generate credentials for your app (to use when talking to Google) and set up redirect URLs so your users are redirected back to your app when login succeeds or fails.
You can follow the guide on Setting up OAuth 2.0 over at Google’s official support site.
Go ahead, do that now, then you can follow along with the next steps.
Note, as part of the set up, you will need to provide an Authorized redirect URI.
Assuming your ASP.NET app is using the default port, you will typically want to add http://localhost:5000/signin-oidc for testing on your local machine.
But watch out, if you’re using Visual Studio 2017, your app might run via IISExpress using a different port, you’ll need to use the correct URL either way.

Securing the ASP.NET Core app#
Now it’s time to look at our ASP.NET MVC app.
You can easily restrict any part of your app using the [Authorize] attribute.
Given we want to block users before they even get to the Angular app, we’ll go ahead and lock down our Home controller’s Index Action.
Modify HomeController.cs as follows.
using Microsoft.AspNetCore.Authorization;using Microsoft.AspNetCore.Mvc;
namespace WeatherStation.Controllers{    public class HomeController : Controller    {        [Authorize]        public IActionResult Index()        {            return View();        }
        public IActionResult Error()        {            return View();        }    }}
When a user accesses our angular app, they start here. With this attribute in place, our application is now effectively restricted to logged in users.
It’s a bit brute force, but this is the simplest approach we can take whilst we get our heads around how all of this works, before we get in to more complicated scenarios like letting users into part of our SPA before requiring them to log in.
All well and good, but if we stop here we’ve literally prevented anyone from getting into our app.

To remedy that, we need to tell ASP.NET Core how we want users to be authenticated, along with some important details like where to send them when they’re not.
Authentication with Cookies#
To keep things simple, we’ll use Cookie Authentication here. If anyone tries to access a restricted resource and doesn’t have a legitimate ASP.NET security cookie, they will be redirected to our super login page.
Start off by bringing in the Microsoft Cookies Nuget package.
Install-Package Microsoft.AspNetCore.Authentication.CookiesWith that installed, you can easily configure Cookies Authentication in Startup.cs.
// ------------using Microsoft.AspNetCore.Authentication.Cookies;
namespace WeatherStation{  public class Startup  {
    // ------------
    // This method gets called by the runtime. Use this method to add services to the container.    public void ConfigureServices(IServiceCollection services)    {      services.AddAuthentication(options => options.SignInScheme = CookieAuthenticationDefaults.AuthenticationScheme);
      services.AddMvc();    }
    public void Configure(IApplicationBuilder app, IHostingEnvironment env,                              ILoggerFactory loggerFactory)    {      // ------------
      app.UseStaticFiles();
      app.UseCookieAuthentication(new CookieAuthenticationOptions      {        AuthenticationScheme = "Cookies",        AutomaticAuthenticate = true,        AutomaticChallenge = true      });
      app.UseMvc(routes =>      {
      // ------------    }
    // ------------  }}
This sets things up so that any unauthorized users attempting to access a restricted part of our app, will be required to log in via OpenId Connect.
Create a login page#
Before we go any further, it would be a good idea to create our login page, complete with button to log in via Google.
Add an AccountController.cs file to the controllers folder and define a simple Login action.
using Microsoft.AspNetCore.Mvc;
namespace WeatherStation.Controllers{    public class AccountController : Controller    {        public IActionResult Login()        {            return View();        }    }}
Create a Login.cshtml view in Views/Account.
@{ <div class='container-fluid'> <div class='row'> <div class='col-sm-12 body-content'> <h2>Sign in to the Weather Checker</h2> <a href="/account/external?provider=OpenIdConnect">Log in with Google</a> </div> </div> </div>}If you’re not using Bootstrap, feel free to skip the divs, the key part is the link to sign in with Google (via OpenId Connect).
Now if you’re paying attention you’ll have noticed we’re linking to /account/external but that doesn’t exist (yet).
Back to the AccountController, add an External action.
using Microsoft.AspNetCore.Http.Authentication;using Microsoft.AspNetCore.Mvc;
namespace WeatherStation.Controllers{    public class AccountController : Controller    {        public IActionResult Login()        {            return View();        }
        public IActionResult External(string provider)        {            var authProperties = new AuthenticationProperties            {                RedirectUri = "/home/index"            };
            return new ChallengeResult(provider, authProperties);        }    }}
With this in place, .NET Core is almost ready to challenge your user’s credentials via Google.
Configure OpenId Connect#
Finally, you just need to bring in Microsoft’s OpenId Connect NuGet package.
Install-Package Microsoft.AspNetCore.Authentication.OpenIdConnectThen head on back over to Startup.cs and modify the Configure method.
-----------
using Microsoft.AspNetCore.Authentication.Cookies;using Microsoft.IdentityModel.Protocols.OpenIdConnect;using Microsoft.AspNetCore.Authentication.OpenIdConnect;
namespace WeatherStation{    public class Startup    {
  // -----------
        public void Configure(IApplicationBuilder app, IHostingEnvironment env,                              ILoggerFactory loggerFactory)        {
            // ------------
            app.UseCookieAuthentication(new CookieAuthenticationOptions            {                AuthenticationScheme = "Cookies",                AutomaticAuthenticate = true,                AutomaticChallenge = true            });
            app.UseOpenIdConnectAuthentication(new OpenIdConnectOptions            {                ClientId = "CLIENT_ID_GOES_HERE",                ClientSecret = "CLIENT_SECRET_GOES_HERE",                Authority = "https://accounts.google.com",                ResponseType = OpenIdConnectResponseType.Code,                GetClaimsFromUserInfoEndpoint = true,                SaveTokens = true,                Events = new OpenIdConnectEvents()                {                    OnRedirectToIdentityProvider = (context) =>                    {                        if (context.Request.Path != "/account/external")                        {                            context.Response.Redirect("/account/login");                            context.HandleResponse();                        }
                        return Task.FromResult(0);                    }                }            });
      // ------------

        }
  // -----------  }}
You can get hold of your ClientId and ClientSecret from Google (assuming you’ve followed the instructions to set up Google OAuth2)
Important: Don’t go including your Id and Secret “naked” in the code like this other than for testing. In reality you’ll want to protect this sensitive information. One option is to use App Secrets during development.
As you can see, OpenId Connect is actually pretty simple to set up. You need to point it at an authority server (Google in this case).
The OnRedirectToIdentityProvider event handler is there to make sure users are redirected to our login page when they try to access a restricted part of the app. The Request.Path check simply makes sure we don’t accidentally block our app as it attempts to complete the sign-in process via Google.
Give it a spin#
All that’s left is to test it out.
When you access your app you’ll be redirected to the login page.
From there, clicking on the Login link will send you off to Google where you can log in with your Google account.
Once you’ve done that, you’ll be sent back to your app where you’ll have been granted access.
Lock down those APIs#
So far we haven’t locked down our API controllers. That means anyone (logged in or not) can still go directly to our APIs.
Thankfully, now we’ve tackled the OpenId Connect plumbing, it’s trivial to add the [Authorize] attribute to any of our API controllers, locking them down for anyone but authorized users (who have an auth cookie).
// -----------
    [Authorize]    [Route("api/[controller]")]    public class WeatherController : Controller    {        [HttpGet("[action]/{city}")]        public async Task<IActionResult> City(string city)        {            using (var client = new HttpClient())            {                try                {
  // -----------
The last step#
Phew, you made it this far.
Now your users can log in via Google (using OpenIdConnect).
Once Google’s confirmed their identity (by asking them to log in), they’re redirected back to your app, complete with access and identity tokens.
ASP.NET Core’s Cookie Middleware then kicks in to serialize your user’s principal (information about their identity) into an encrypted cookie. Thereafter, any requests to your app validate the cookie, recreate the principal and assign it to the User property on HttpContext.
One last thing, you might want to give your users a way to sign out of your app. Just add the following to your AccountController.
public async Task<IActionResult> SignOut(){    await HttpContext.Authentication.SignOutAsync("Cookies");
    return RedirectToAction(nameof(Login));}
Any request to /account/signout will now sign them out, requiring them to log in again to access your app.
photo credit: torbakhopper authorized personnel only, scott richard via photopin (license)
Struggling to figure out what to focus on with Blazor?
BlazorSharp - The .NET Web Developers community is here to help!
- Connect with your fellow .NET web developers
- Keep up to date with the latest .NET changes
- Exchange tips, tools and tactics