Exploring Blazor Changes in .NET 8 - Auto Render Mode
This is an article from a series of posts exploring the changes that were (then) coming in .NET 8, ahead of its release. As .NET 8 is now long since released, some of the specific implementation details may have changed.
They say there’s no such thing as a free lunch, and that’s certainly true when it comes to Blazor’s existing hosting options.
Choose Blazor Server and you get a fast initial load, but then a degree of latency as every DOM interaction is sent to the server (via SignalR). You also need to scale your server to handle the required number of concurrent connections.
Opt for Blazor WASM and you get a slow initial load, while the framework and your app is downloaded by the user’s browser, but then everything runs fairly snappily as DOM interactions are handled within the browser.
But what if you want the best of both worlds - Fast initial load plus low latency DOM interactions?
For that we have .NET 8 and its new auto render mode.
Have your cake and eat it too#
.NET 8 defaults to Server Side Rendering for your components with the option to make individual components run ‘interactively’ (using Blazor WASM or Blazor Server).
Now, with .NET 8 preview 7 (and higher) you can opt for “auto” render mode instead.
This uses WebAssembly to render your component, but only if the .NET WebAssembly runtime can be loaded.
NOTE
In Preview 7 the check to see if WASM is available is a timeout. If .NET can load up WASM quickly enough (within 100ms) the component will render using WASM, otherwise it will fall back to Server.
In RC1 (and later) .NET will instead check to see if the WASM resources have been cached, and if so it will use WASM (else fall back to Server). If that check fails it will revert to the timeout mechanism for checking.
If you’re interested in the gory details of exactly how this check works, you can find the details in this github issue!
Typically this means, if the user’s browser has previously downloaded (and/or cached) the runtime, or they’re running on a super-fast network connection, they’ll get Blazor WASM.
If the runtime can’t be loaded quickly enough then the framework will fall back to using Blazor Server while the .NET WebAssembly runtime is downloaded in the background.
Crucially, for your users, this means components which are interactive as soon as the page loads, but which aren’t dependent on that Blazor Server connection after the first time (meaning less load for your server, and lower latency for ongoing DOM interactions).
Here’s a simple example of it in action.
First, a Banner component:
<div class="card">    <div class="card-body">        @Text    </div>    <div class="card-footer">        <button class="btn btn-primary" @onclick="SayHello">Click me</button>    </div></div>
<p>@message</p>
@code {
[Parameter] public string Text { get; set; }
string message;
private void SayHello() { Console.WriteLine("Hi from banner"); message = "Hi!"; }
}Which is rendered via the Index page.
@page "/"
<PageTitle>Home</PageTitle>
<h1>Home</h1>
<Banner @rendermode="@RenderMode.Auto" Text="Hello"/>
Notice the rendermode is set to Auto.
When we run this in the browser we see the socket connection, then Blazor WASM finishes loading shortly after:
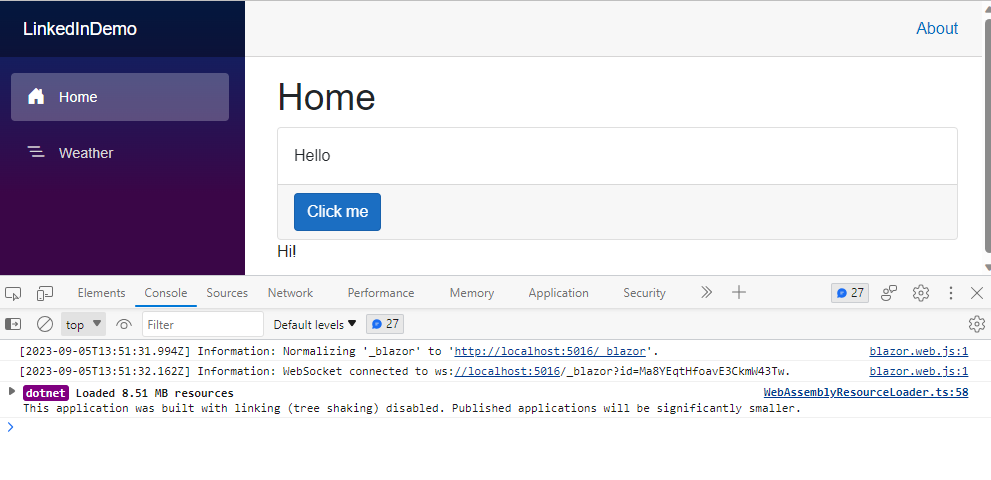
For this visit the Banner component has been rendered via Blazor Server and will continue running on Blazor Server until the user moves away from the page (or closes the browser).
Next time we run the app, because the app and framework are already cached in the user’s browser Blazor WASM will be able to load and the component will run via WASM instead.
Making It Work#
Something to bear in mind here - making components interactive using WebAssembly requires some very specific configuration and architecture for your app.
Any components which need to run via WASM need to be located in a separate project (because you probably don’t want your server projects being downloaded to the browser!)

Changes to the Server project#
The Server project needs to reference the Client project.
You’ll need to update the _Imports.razor file to include the namespace for the components from the client project:
...
@using LinkedInDemo.Client.Pages
You’ll also need to reference the following NuGet package in your Server project:
dotnet add package Microsoft.AspNetCore.Components.WebAssembly.ServerFinally, to actually enable rendering on both server and WebAssembly you’ll need to update the calls to AddRazorComponents and to MapRazorComponents in the server project’s Program.cs:
...
builder.Services.AddRazorComponents()    .AddServerComponents()    .AddWebAssemblyComponents();
...
app.MapRazorComponents<App>()    .AddServerRenderMode()    .AddWebAssemblyRenderMode();
With that in place, you can now add components to the Client project, then reference them from components in your Server project and enable auto render mode whenever it makes sense to do so!
All posts in NET 8 Blazor Evolved
- Exploring Blazor Changes in .NET 8 - Auto Render Mode
- Exploring Blazor Changes in .NET 8 - Capture User Input with Forms
- Exploring Blazor Changes in .NET 8 - Interactive Components using Blazor WASM
- Exploring Blazor Changes in .NET 8 - Interactive Components using Blazor Server
- Exploring Blazor Changes in .NET 8 - Server Side Rendering (SSR)