Pre-populate a textbox using ASP.NET Core MVC
I’ve spent the last week trying to just create a textbox that is prepopulated with some text but I can’t make it work
”A1” (on Reddit)
If you’re new to it, ASP.NET MVC can prove really difficult to learn.
Sometimes it feels like even the simplest of tasks (showing text in a textbox) turns into hours of research, conflicting opinions and seemingly endless libraries to choose from.
It’s easy to feel defeated before you’ve even begun but fear not, to show data on a page using MVC you actually only need to know a few key concepts.
This post refers to ASP.NET Core MVC but largely applies to earlier versions of MVC too.
Where to start?#
I find it really helps to start with a mockup of the thing you’re trying to build.
No matter how small or trivial the feature is, try sketching it out first.
You can use a whiteboard or pen and paper to do this.
There are always online tools like Balsamiq Mockups that make it easy to build up mockups using pre-built components.
You’ll be surprised how much of a feature lies in working out what you’re going to see on screen and details like what labels to use for your input fields…
Here’s one for a simple page to let a user change their profile…
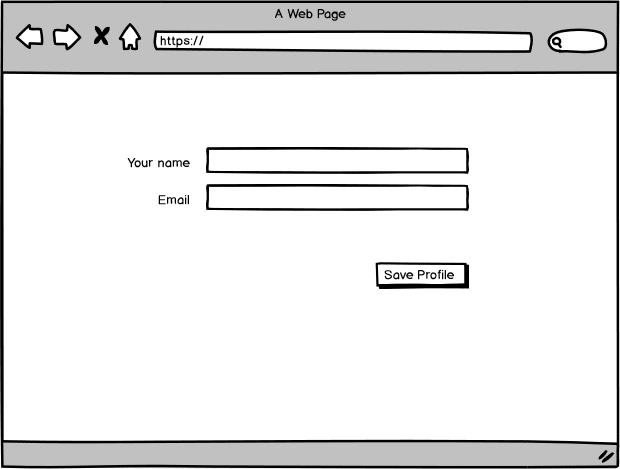
And remember it pays to keep things simple when you’re just starting out.
Yes, we could easily add more fields to this profile and consider fancier features like profile pictures etc. But remember the aim is to get something working as simply as possible, and to improve your understanding of MVC as you go.
You can always visit it again once you’ve got the basics working.
Now you know what to build…#
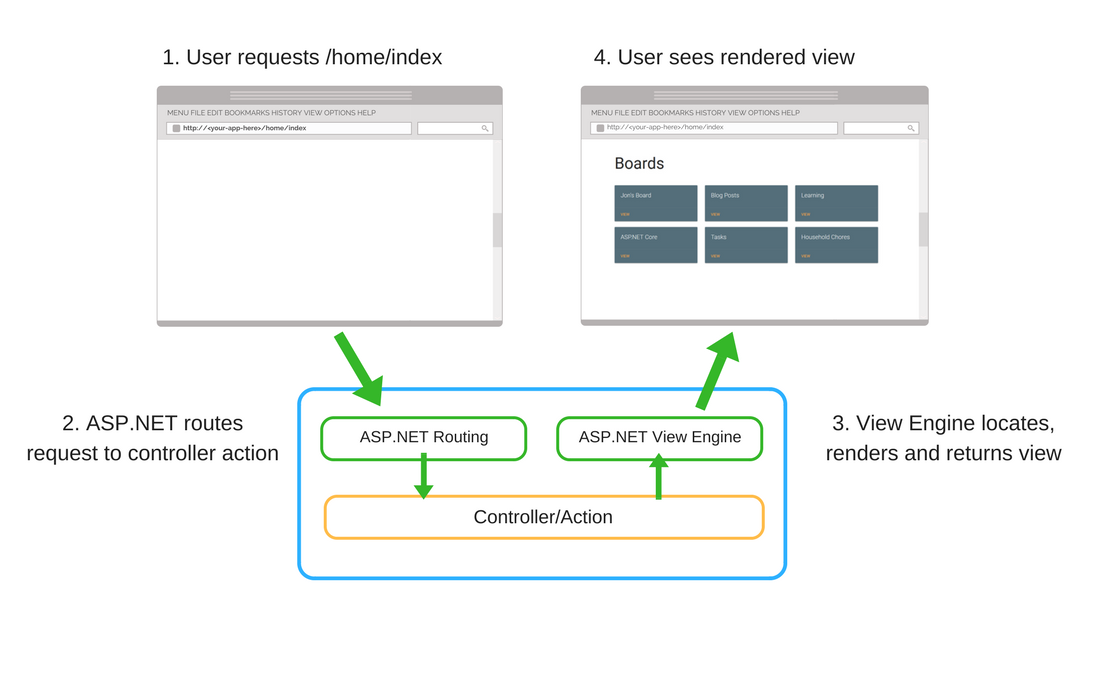
Generally speaking, when you want to render anything on the screen using ASP.NET MVC you’re going to need three things (and the clue’s in the name!).
A Controller, View and ViewModel.
This applies whether you want to show text, a textbox, dropdown list or anything else.
When a user requests a page on your site, their request is sent to your application and forwarded to a Controller (specifically an Action on that Controller).
The action then returns a result (typically a View) which your user sees in their browser.
A simple controller action might look like this.
public class UserProfileController : Controller{ public IActionResult Index() { return View(); }}NOTE
A word on ASP.NET Routing
In this example we have a UserProfileController with a simple Index action.
Using ASP.NET MVC’s default routing setup, your users will end up here if they navigate to this URL.
http://<your-app-here>/userprofile/index
This url consists of the controller name (userprofile) and the action (index).
Or indeed you can skip the index bit because ASP.NET Core’s default routing will try to go to any action called Index by default.
http://<your-app-here>/userprofile
The action itself is about as simple as you can get, it just returns a View.
Add a View#
If you try to access a controller action and haven’t created the corresponding view you’ll get a handy message.

In this case ASP.NET expected to find a view called Index.cshtml (and looked in a couple of places to find it).
This error points to our next step.
If we add a new view to the relevant folder (UserProfile) MVC will spring into life and return that view when we hit our controller action.
http://<your-app-here>/userprofile
When you add a new view in Visual Studio you get this very simple starting template…
@{    ViewData["Title"] = "View";}
<h2>View</h2>
Not very inspiring, but ready for us to add something more relevant to our feature.
Getting data to your View#
We’re ready to show data in our View but how do we get it there?
The magic glue that binds all of this together is the ViewModel.
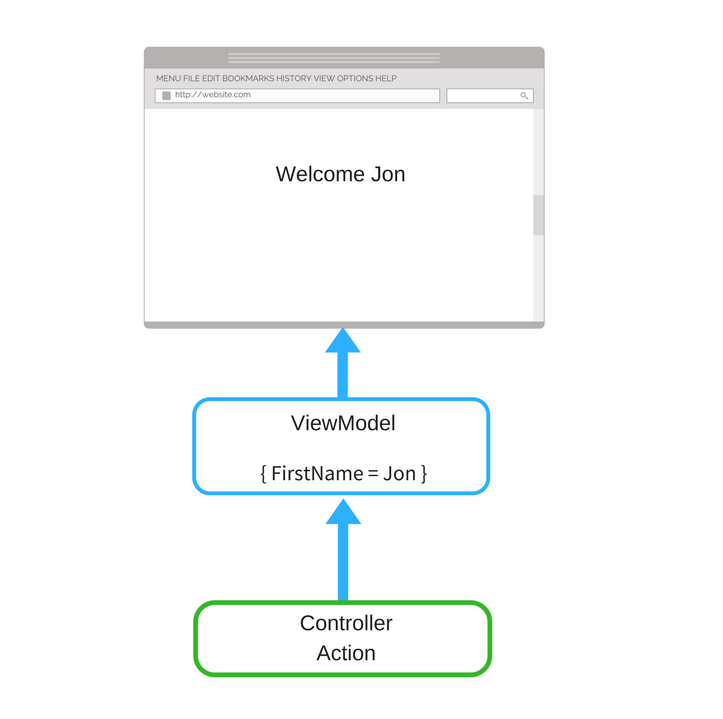
A ViewModel is really just a class with some properties which contain information you’d like to display in your view.
Here’s one for the profile page…
public class EditUserProfileViewModel{ public string Name { get; set; } public string Email { get; set; }}Anything you want to show on the page will need a matching property in the ViewModel.
Modify your controller to use the ViewModel#
Now to use this ViewModel in our controller.
We can easily return an instance of this EditUserProfileViewModel along with the View.
public IActionResult Index(){    var viewModel = new EditUserProfileViewModel {        Name = "Jon Hilton",        Email = "me@jonhilton.net" };
    return View(viewModel);}
When learning MVC it’s useful to stick to hardcoded data (like “Jon Hilton” here); hardcoded data makes it much easier to throw things around and change your code as you learn new concepts.
Which Model?#
This is all well and good, the controller returns a ViewModel, the ViewModel includes someone’s name and email.
But our View is still just that virtually empty template we started with…
@{    ViewData["Title"] = "View";}
<h2>View</h2>
We need to inform MVC which Model we’re expecting back from the controller action and to do that we’ll need to add a @model reference.
This generally sits right at the top of your View.
@model <your-app-namespace-here>.Models.EditUserProfileViewModelYou’ll need to know the full namespace of your ViewModel in order to reference it. You can always check what that is by looking at the ViewModel itself…
namespace TestApp.Models{ public class EditUserProfileViewModel { public string Name { get; set; } }}In this case the full @model reference would be…
@model TestApp.Models.EditUserProfileViewModelNow if you just wanted to show the values as plain text in your view, you could just use some simple binding syntax like this…
<h2>User Profile</h2>
@Model.Name
But what about those text boxes we saw in the mockup?
Tag Helpers to the rescue#
New to ASP.NET Core is the concept of tag helpers which let you easily bind your HTML elements to properties on your ViewModel.
Here’s the simplest code we could possibly write to show our ViewModel’s values in input boxes…
<h2>User Profile</h2>
<input asp-for="Name" /><input asp-for="Email" />
Preview this in the browser and there you have it…

Ok, so it doesn’t look exactly like our Mockup yet…
The ASP.NET Core MVC starter project inclues Bootstrap, so your next step would probably be to use that to add a few labels and lay your form out to reflect the original mockup.
Posting the data back.#
Next you’d probably want to send these values back to your application.
For that you’d need to employ a form, this article walks you through using a form and Tag Helpers to post data back to your application.
Next Steps#
Have a go yourself, you’ll find it much easier to learn that way.
- Think of an idea for a page which needs to show some data
- Keep the idea as simple as possible and create a mockup for it
- Set about creating a ViewModel (based on your mockup)
- Send the ViewModel up to the View (using hardcoded data) and try binding your View to your ViewModel using Tag Helpers
Your skills aren't becoming obsolete. They're becoming essential.
Practical engineering principles for building software that works - with or without AI.