Secure your ASP.NET Core 2.0 API (part 1 - issuing a JWT)
You’ve built the API but what about security?#
There are many reasons you might choose to expose an API from your ASP.NET Core 2.0 app: supporting windows-based software, another web application, or maybe you’re building a SAAS product and want to give advanced users some mechanism to integrate with your platform.
But clearly, the most common (and likely) scenario is that you want to build all, or some, of your application using a front-end Single Page Application framework such as ReactJS, Angular or Aurelia.
Building and publishing an API to support your SPA is one thing, but without authentication you run the risk of unathorised users bleeding your site dry (until there’s no data they haven’t found) or worse, making calls that save, update or (gasp) delete your precious data.
Take to the internet to find out how to lock down your ASP.NET Core 2.0 API and you’ll find plenty of talk about OpenId Connect, OAuth2, Identity Server 4 and (confusingly) Microsoft Identity.
Then there’s JWT bearer tokens, refresh tokens, implicit flows, hybrid flows.

All of it matters and you may well need to learn these concepts in due course, but, a bit like driving, rather than learning how to replace your carburetor on day one, you can get started by simply knowing where the pedals and steering wheel are (and how to use them).
So let’s take a step back and look at the problem.
You need to lock all (or some) of your API so that it can only accessed by authenticated users.
And for the sake of argument, users will be accessing the API via your client-side (javascript SPA) application.
Enter the JWT token#
The JSON Web Token is a standard that defines a way to securely transmit information between two parties as a JSON object.
If you’ve spent any time building an API or a front-end app, you’re almost certainly familiar with JSON, which itself, is a standard file format designed to transmit data objects in a human-readable form.
JWT sits on top and standardises the sending of claims information between parties, using the JSON format.
{ "name": "Jon", "middle_name": "Who's asking?!"}Claims are pieces of information about your users. One or more claims combined together, create an identity for your user, so you can decide what they should and shouldn’t be allowed to do (within your application).
In the example above, name and middle_name are our claims.
So how might you use JWT to secure your API?
Here’s one option.
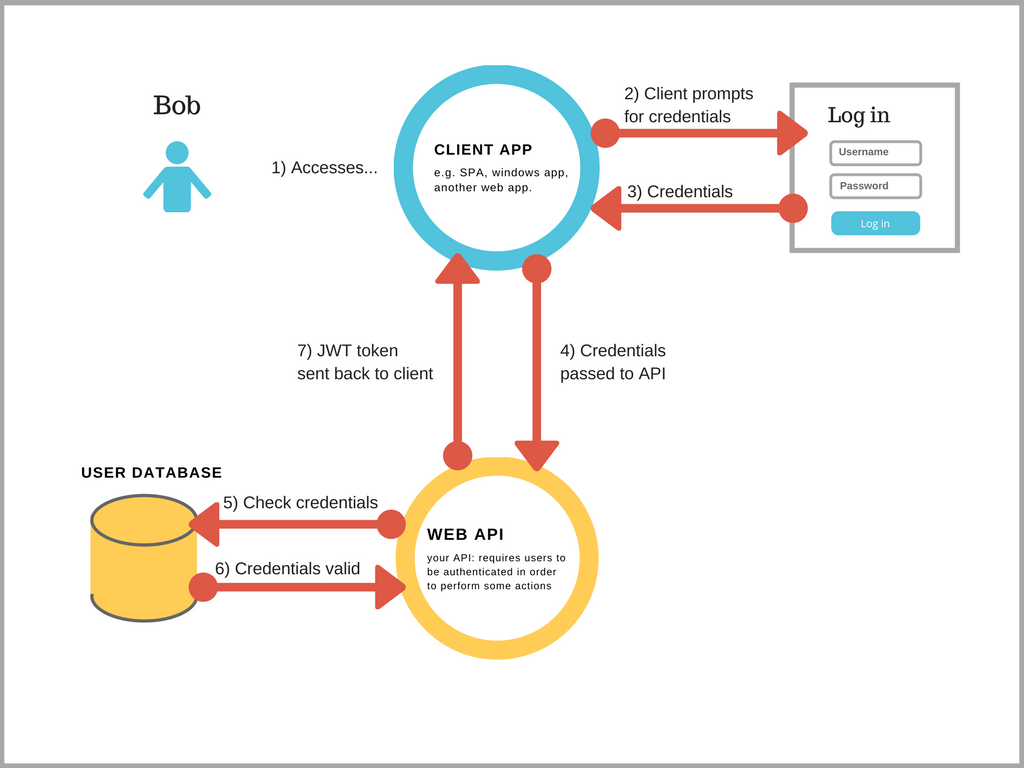
- A user (Bob in this case) visits your site
- They see your client app (Angular/React etc.) login page
- They submit their username/password
- Your client app sends these credentials over to your ASP.NET Core web API (to an action whose sole job is to issue JWT tokens)
- The web API checks the credentials against a user store (often a database)
- If the credentials are valid
- Your web API issues a JWT token back to the client app
And that’s a big chunk of the problem solved.
Your API can now issue a JSON Web Token to any user with valid credentials.
Once your client app gets that token, it can happily send it with every subsequent request to your API.
If your API receives a request with an invalid token, it can return a 401 unauthorised and your client app can redirect the user to the login page (or an access denied page, whichever makes most sense for your application).
How do you issue tokens using .NET Core?#
At this point it’s worth noting you can outsource this bit if you want. In fact, it might be a good idea. Think of it like hiring a chauffeur to get you about, so you don’t need to drive everywhere yourself.
Security matters and can get complicated quickly, so rather then “rolling your own” you could make use of Identity Server 4 (which you embed in your app, to serve and validate tokens) or utilise a hosted solution such as Auth0 which will handle everything for you (including user management, password resets etc.) and integrates into your app with a few lines of code.
But, you can issue your own JWTs without using any third party solutions and for simple scenarios this is good enough (plus it pays to understand this bit even if you do adopt ID4 or Auth0 down the line).
For this to work, you’ll need a dedicated controller action that returns tokens when given valid user credentials.
[AllowAnonymous][HttpPost]public IActionResult RequestToken([FromBody] TokenRequest request){    if (request.Username == "Jon" && request.Password == "Again, not for production use, DEMO ONLY!")    {        var claims = new[]        {            new Claim(ClaimTypes.Name, request.Username)        };
        var key = new SymmetricSecurityKey(Encoding.UTF8.GetBytes(_configuration["SecurityKey"]));        var creds = new SigningCredentials(key, SecurityAlgorithms.HmacSha256);
        var token = new JwtSecurityToken(            issuer: "yourdomain.com",            audience: "yourdomain.com",            claims: claims,            expires: DateTime.Now.AddMinutes(30),            signingCredentials: creds);
        return Ok(new        {            token = new JwtSecurityTokenHandler().WriteToken(token)        });    }
    return BadRequest("Could not verify username and password");}
(Usual caveat applies, using a hardcoded username/password doesn’t scale very well and will only get you so far).
This code turns out to be pretty simple. We start off with a quick check of the username and password that’s been sent in the body of the POST request to RequestToken. If the credentials are invalid, we immediately return a BadRequest response to the client app, informing it the attempt to generate a token was unsuccessful.
if (request.Username == "Jon" && request.Password == "Again, not for production use, DEMO ONLY!")Credentials checked, we need to build and return a JWT token.
As with our cookie example, we push the user’s name into a claim, so we can identify the user later on.
var claims = new[]{ new Claim(ClaimTypes.Name, request.UserName)};Then we need to create the token itself. To do so we need to sign the token using a secret key.
This secret will be shared between your API and anything that needs to check that the token is legit.
Turns out the ASP.NET Core configuration system is a good place to store this secret without putting it directly in the code.
var key = new SymmetricSecurityKey(Encoding.UTF8.GetBytes(_configuration["SecurityKey"]));var creds = new SigningCredentials(key, SecurityAlgorithms.HmacSha256);.NET Core’s JwtSecurityToken class takes on the heavy lifting and actually creates the token.
var token = new JwtSecurityToken( issuer: "yourdomain.com", audience: "yourdomain.com", claims: claims, expires: DateTime.Now.AddMinutes(30), signingCredentials: creds);The issuer is a claim and indicates which application generated this token in the first place.
If you have more than one client application that might interact with your API, it can be useful to include an indication of the intended audience in the token itself.
NOTE
What’s in a JWT?
It’s useful to understand the basic structure of a JSON Web Token.
It consists of three parts, separated by a .
HEADER.PAYLOAD.SIGNATURE
The header indicates that the token is JWT and which hashing algorithm has been used when creating it. This is Base64Url encoded.
The payload is the part that is the application-specific part which holds claims you wish to transmit (also Base64Url encoded).
{ "name": "Jon", "middle_name": "Who's asking?!"}Finally, using the algorithm specified in the header, your server will concatenate the encoded header and payload, then sign them using a secret.
That signature is then appended to the end of the token and can be used (by anyone who has the secret) to verify that the sender of the JWT is who they claim to be and that the token wasn’t tampererd with before it reached its destination.
You have a JWT, now what?#
You might be feeling pretty pleased with yourself now, your client app is the proud owner of a JWT and you know what a JWT is (and looks like).

But your API is still wide open to anyone (with or without a token) who fancies a gander at it.
Fear not, in the next post we’ll explore how to lock down our API to only serve clients who have a valid JWT…
Photo Credits:
juhansonin Not sure what this is… via photopin (license)
Tom Simpson Threepio and Artoo studying via photopin (license)
Melinda Young Stuart Academic Library, Mills College. via photopin (license)