A simple way to secure your .NET Core 2.0 web app
Developers gonna develop…#
If you’re starting a new .NET Core 2.0 web app, the chances are you want to jump in to building your features, maybe get to grips with all the new ‘n’ shiny things in ASP.NET Core.
I recently worked on a greenfield ASP.NET Core 2.0 app where we had exactly that sense of excitement. This was a brand new project, we had a freshly released version of ASP.NET Core to play with and nothing was going to hold us back.
It turns out “nothing” in this case was actually the very first requirement, our users needed a way to log in.
Before we did anything else, we needed to lock the application down to specific users, lest our continuous deployments to Azure should expose the application’s data to people who shouldn’t see it.
The problem is, if you go searching for how to secure your ASP.NET core app, you quickly descend into detailed discussions of cookies, JWT tokens, roles, claims, Microsoft Identity, Identity Server and more.
The list goes on.
But what if you don’t to wade through all that detail? You just want to start with the basics and lock your app down to one user, so it’s not immediately available to the entire world.
Back to basics#
Just for now, forget all this talk of bearer tokens, OAuth and OpenID Connect.
Let’s proceed on the basis that this is an MVC app, so no APIs or Single Page Applications to consider.
We just want to stop the world and its dog from delving into sensitive parts of our application.
Configuring ASP.NET Core to require authentication#
Imagine we’re starting with an ASP.NET Core 2.0 MVC application (with no authentication mechanism configured).
The first step is to enable authentication for our site, which we can do by modifying startup.cs.
We can start by adding the relevant Authentication services to our application.
public void ConfigureServices(IServiceCollection services){    services.AddAuthentication(CookieAuthenticationDefaults.AuthenticationScheme)        .AddCookie(CookieAuthenticationDefaults.AuthenticationScheme,            options =>            {                options.LoginPath = new PathString("/auth/login");                options.AccessDeniedPath = new PathString("/auth/denied");            });
     // ---------------     // rest of configureServices code goes here...}
We’re going to stick with cookies for now. This means our logged in users will get a cookie in their browser, which gets passed to our app on every request, indicating that they are authenticated.
Notice how we’ve configured two paths, the path to the login page (where we can send unauthenticated people when they try to access a restricted area) and the path to an access denied page (useful for when they inevitably enter incorrect credentials).
We also need to tell our app to go ahead and actually enable authentication. Happily, this is very very simple in .NET Core 2…
public void Configure(IApplicationBuilder app, IHostingEnvironment env){    app.UseAuthentication();
    // ---------------    // rest of configure code goes here...}
Just another Login form#
So now our app knows we’re going to be using authentication, but there’s more work to be done.
We need a way to identify our users, the common way being to ask them for a username and password.
Login forms are straightforward enough, here’s one to get us started.
<h2>Hmm, looks like you need to log in</h2>
<form asp-controller="Auth" asp-action="Login" method="post">    <label for="username">Username</label>    <input id="username" name="username" type="text"/>    <label for="password">Password</label>    <input id="password" name="password" type="password" />    <button type="submit">Log me in</button></form>
If we’re using the default routing for MVC, you’ll want to create an AuthController with a Login action that returns this view.
NOTE
If you’re not familiar with them, the asp- attributes are tag helpers, new to ASP.NET core, which make it easier to link your html to your ASP.NET MVC controllers. Read more about tag helpers here.
In this example, the form contents will be posted to the Login action on an Auth controller.
A word to the wise, if you start with an empty web app project you’ll find that Tag Helpers don’t work automatically.
The easiest way to get them working is to create a _ViewImports.cshtml file and add this line to it…
@addTagHelper *, Microsoft.AspNetCore.Mvc.TagHelpers
If you start with one of the other starter templates you’ll probably find this file is created for you.
The logging in bit#
To keep this super, super simple, we’ll opt to hard-code a username and password for now.
If our users enter the correct combination, they’ll be logged in, with full access to “locked down” parts of the application.
Now let’s be honest, hardcoded usernames and passwords are somewhat limiting (and not at all secure if your code ends up in a public Github repo) but they do tackle our urgent requirement to provide a mechanism for users to log in, and gain access to parts of the site that will be unavailable to Joe Public.
This falls into the camp of “doing the simplest possible thing first”, so you can start to build up momentum with your new app, rather than getting bogged down in building your own user management system from day one.
The login form will post to this controller action…
[HttpPost, ValidateAntiForgeryToken]public async Task<IActionResult> Login(string returnUrl, string username, string password){    if (username == "Jon" && password == "ABitSimplisticForProductionUseThis...")    {        var claims = new List<Claim>        {            new Claim(ClaimTypes.Name, "jon", ClaimValueTypes.String, "https://yourdomain.com")        };        var userIdentity = new ClaimsIdentity(claims, "SecureLogin");        var userPrincipal = new ClaimsPrincipal(userIdentity);
        await HttpContext.SignInAsync(CookieAuthenticationDefaults.AuthenticationScheme,            userPrincipal,            new AuthenticationProperties            {                ExpiresUtc = DateTime.UtcNow.AddMinutes(20),                IsPersistent = false,                AllowRefresh = false            });
        return GoToReturnUrl(returnUrl);    }
    return RedirectToAction(nameof(Denied));}
There’s our super insecure hardcoded username/password check (as discussed).
We’ve opted to use claims-based security.
In the most basic sense, you can think of Claims as pieces of information about your user. In this case we’re simply storing the user’s name in a claim, which we then attach to an identity for the user.
This identity is the representation of your user that ASP.NET core can interrogate, to find out anything it needs to know.
You can assign many claims to one identity, but ASP.NET Core requires the name claim as a minimum requirement (it will error if you don’t assign one).
Next up we create a user principal. If this is your first foray into ASP.NET Core authentication then this can be a little confusing, but it’s worth noting you could have more than one identity and attach them all to the same principal.
We’ve no need to handle multiple identities for the same user yet, so we can move along to the SignInAsync method on the HTTPContext, which logs our user in.
In practice, this creates an encrypted cookie holding the user’s information (the Claims Principal). From here on (until they exit the browser) your user is authenticated.
Because we’ve set IsPersistent to false, the cookie will be lost when our user exits their browser, and will have to log in again next time they come to the site.
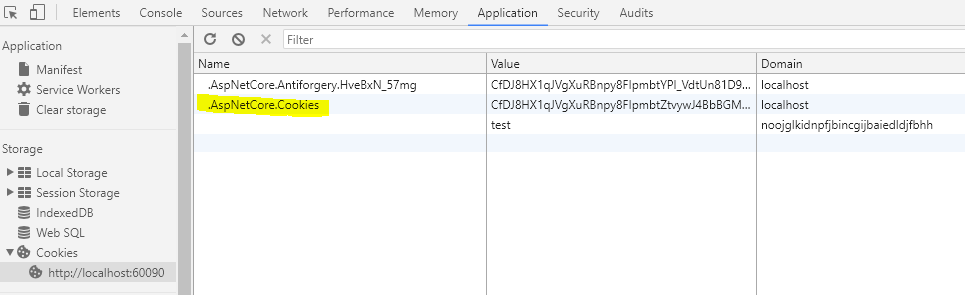
If you want to see what that cookie looks like, check out the Application > Cookies window in Chrome (you’ll find a similar view in other browsers) and you’ll find it there, called .AspNetCore.Cookies.
Once they’re logged in, the user is redirected to the original page they requested, or the home page. You can do this with a simple helper method.
private IActionResult GoToReturnUrl(string returnUrl){ if (Url.IsLocalUrl(returnUrl)) { return Redirect(returnUrl); } return RedirectToAction("Index", "Home");}No access for you#
This is all well and good, but currently there’s no reason for anyone to log in to the site, because nothing is locked down.
Let’s remedy that by restricting access to the main homepage for the app.
[Authorize]public class HomeController : Controller{ public IActionResult Index() { return View(); }}The [Authorize] attribute will trigger ASP.NET Core to redirect any users who aren’t logged in (don’t have an auth cookie) to the login page (that we configured in startup.cs).
It’s all about you#
So that’s almost the entire process. But it would be nice to greet the user by name.
We’ll do this on our main index view…
<h1>Hi @User.Identity.Name, you're in the club.</h1>Let me out of here#
Finally, we should probably let them log out, if they so wish.
All this needs is a simple form.
<form asp-controller="Auth" asp-action="Logout"> <button type="submit">Log out</button></form>And controller action.
public async Task<IActionResult> Logout(){ await HttpContext.SignOutAsync(); return RedirectToAction(nameof(Login));}In summary#
For simple use cases, where you’re using MVC in an application on a single domain, cookie auth works just fine and is easy to set up.
In this case we used a single hard-coded username/password but you’ll need some way to store usernames and passwords.
If you want an “off-the-shelf” solution, including code to handle adding users, changing passwords etc. you can look to Microsoft Identity (or even third party solutions like Auth0).
If you just want to lock down parts of your app whilst you get on with building it, this approach is a decent start and you can ramp up the complexity as you need.
Your skills aren't becoming obsolete. They're becoming essential.
Practical engineering principles for building software that works - with or without AI.