How to get data from an HTML form to your ASP.NET MVC Core Controller
All I want to do is make a simple page that allows users to update a database by filling in a form!
You have a form, you have an ASP.NET Core MVC application, but how on earth are you supposed to get the data from the form to your ASP.NET Controller actions?
Turns out you have two options (well, actually there are more than that, but let’s focus on these two as they’re the ones you’re most likely to encounter).
The manual way (using plain old HTML forms)#
Let’s say you need a way to record someone’s basic details (like their name, age etc).
To achieve this you’re going to need a form, which can be wired up to submit whatever information the user types in, back to your application.
Your app can then do whatever it needs to with that information (store it in a database, email it to someone etc.).
Let’s start with the bit our users will actually see; the form itself.
<form method="POST"> <label for="firstName">Your first name</label> <input type="text" id="firstName" placeholder="Your name goes here" /> <input type="submit" /></form>On first glance, our HTML form looks reasonable. We’ve got a single text box (firstName) and the form is going to send its data via an HTTP Post.
Unless we indicate otherwise, this will post back to the same location used to serve the form.
So, using default routing conventions, we could use a controller like this…
public class FormController : Controller{ [HttpGet] public IActionResult Index() { return View(); }
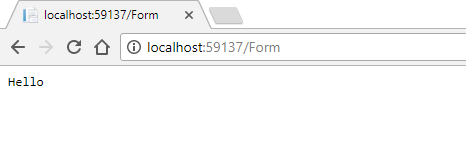
[HttpPost] public IActionResult Index(string firstName) { return Content($"Hello {firstName}"); }}We’ll see our form if we browser to http://<YourSiteHere>/form.
When we submit the form, it will be posted to the same address (http://<YourSiteHere>/form) (as an HTTP Post request).
But, we have a fatal flaw in our form! Run this, enter a name, submit the form and all you’ll get is a half-complete sentence.
For the value of the input to be submitted as form data, it needs to have a name attribute.
<input type="text" id="firstName" placeholder="Your name goes here" name="firstName" />With the name attribute in place, ASP.NET MVC spots the incoming “firstName” value (in the submitted form data) and binds it to the firstName parameter we specified in the Index (POST) method on our controller.
NOTE
Diagnose form data problems
When you come across issues like this, it isn’t always obvious what’s causing the problem.
This is where the Chrome network tab comes into its own.
Submit your form with the developer tools open (F12) and you’ll see the form post in the network tab.

Click the relevant request and check out the Form Data section.
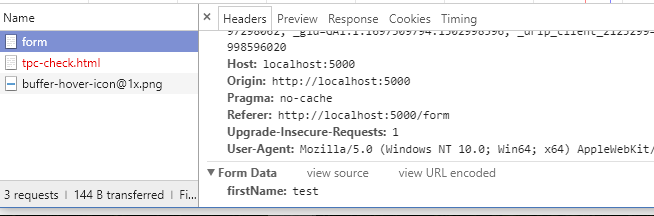
In this example you can see that firstName has been submitted as form data and so should be available to ASP.NET Core.
If you don’t see the values you expect then the chances are your form isn’t working properly and that’s where to focus your efforts on fixing the problem.
Using Tag Helpers#
Now we know how to manually set up our forms to post the right data, correctly tagged so our MVC controllers know how to handle it.
But this seems like a bit of a faff (and is asking for trouble every time we rename anything either in the HTML or the C#).
With ASP.NET Core you have an alternative.
You can use Tag Helpers to save you manually adding name attributes to all of your input fields.
First up, create a class to act as the model for our page.
public class FormModel{ public string FirstName { get; set; }}Now we can tweak our view (cshtml page) to use this model by adding a model declaration at the top.
@model FormBasics.Controllers.FormModelWhen you try this for yourself, make sure you specify the correct namespace, where your model exists.
With that in place, we can start using tag helpers to do some of the plumbing (e.g. adding name attributes) we’d otherwise have to do ourselves.
<form asp-action="Index" asp-controller="Form"> <label asp-for="FirstName"></label> <input asp-for="FirstName" placeholder="Your name goes here"/> <input type="submit" /></form>We’ve made a few changes here.
First we’ve explicitly defined the action and controller that this form will post back to, using asp-action and asp-controller. This isn’t strictly necessary, but it doesn’t hurt to be explicit, just in case we start moving things around, the form will continue to post to the correct controller action.
Secondly, because this page now knows about its model, we can use the asp-for tag helper on our input and label elements, specifying the relevant property name from our model.
Here’s the resulting form.

And here’s how this will be rendered (it’s often worth taking a look at the source code in your browser to see what HTML we end up with in cases like this).
<form action="/Form" method="post"> <label for="FirstName">First Name</label> <input placeholder="Your name goes here" type="text" id="FirstName" name="FirstName" value=""> <input type="submit"> <input name="__RequestVerificationToken" type="hidden" value="<token_generated_here>"></form>Note how ASP.NET has picked up that the rendered form should make a POST to /form and has automatically included the name attribute for the input field.
If you’re wondering what the __RequestVerificationToken is, this is a neat way to reduce the risk of your application being duped by a cross site request forgery attack.
I’ve got a model and I’m not afraid to use it#
Now we’ve got a model we can get rid of that string parameter in the Index POST action and replace it with a FormModel parameter.
[HttpPost, ValidateAntiForgeryToken]public IActionResult Index(FormModel model){ return Content($"Hello {model.FirstName}");}ASP.NET MVC Core will bind the form data to your model automatically.
This also means we won’t find ourselves constantly updating the Index action every time we need to handle another value submitted via the form.
Incidentally, I’ve also added the other half of the Request Verification Token check here (the ValidateAntiForgeryToken attribute) to make sure this form has been posted from our site (and not a malicious site hosted by someeone else).
A better label#
Finally, by default the asp-for tag helper on our label has used the name of the property for its value.
We can improve this and be explicit about what the label should say, with an attribute on our model.
public class FormModel{ [DisplayName("First Name")] public string FirstName { get; set; }}
Admittedly, this form isn’t going to win any prizes for its design, but at least the label reads a little better!
What about HTML Helpers?#
If you’ve used previous versions of MVC, you’re probably familiar with the HTML Helpers from previous versions. They look like this…
@Html.TextBox("firstname")
One huge benefit of Tag Helpers over HTML Helpers, is that they leave you free to define your markup using standard HTML tags. Rather than have some magic render the entire element for you, the tag helper extends your standard HTML element. This is evident in our example where we are free to add a placeholder attribute to the FirstName input without jumping through extra hoops to bend an HTML Helper to our will.
In Summary#
Lean on ASP.NET Core’s Tag Helpers to get your forms up and running.
Wire up your inputs (text boxes etc) to something on the model (using Tag Helpers) and the value entered by the user will be submitted as formdata when the user submits the form.
ASP.NET Core’s model binding will then kick in and assign the posted values to an instance of the Model.
From here, you can do whatever you need to with the model (including saving it to a database etc.)