Build your .NET Core app using Yeoman
Creating new projects seems to have become awfully complicated in recent times.
It’s OK if you’re creating a basic .NET Core web app but anything vaguely “front-endy” seems to require a never ending, constantly changing list of tools, frameworks, task runners and dependencies.
Thankfully you don’t need to set everything up yourself (manually) because Yeoman can do it for you.
Yeoman is a scaffolding tool that uses generators to help you get a new project up and running quickly (using predefined templates).
Installing Yeoman#
You’ll need to make sure you’ve got NodeJS installed (this will give you NPM).
NPM is the package manager for NodeJS (although, whisper it quietly, there’s a new player in town).
Now you can install Yeoman. We’ll also install Bower here because some of the .NET Core templates we’re about to use require it.
npm install -g yo bowerYou may need to launch the command prompt as Administrator on Windows to ensure you have the relevant permissions to install global NPM packages.
-g indicates that Yeoman and Bower should be installed globally making them available for use by anything on your machine (including the command line).
If you want to see where global NPM packages will be installed, use the command npm root -g
Yeoman uses generators to scaffold your application. This means you can run a simple command and Yeoman will do the heavy lifting of setting up your folder structure and adding various files.
There are generators for Angular, ReactJS and many more besides (see the full list on the Yeoman web site).
The ASP.NET Generator#
To create .NET Core apps using Yeoman you’ll need to install the ASP.NET generator.
npm install -g generator-aspnet
Now you’re all set to create your .NET Core application.
Change to the directory you want to create your project in, then call Yeoman and tell it to launch the ASP.NET generator.
cd TestAppsyo aspnet
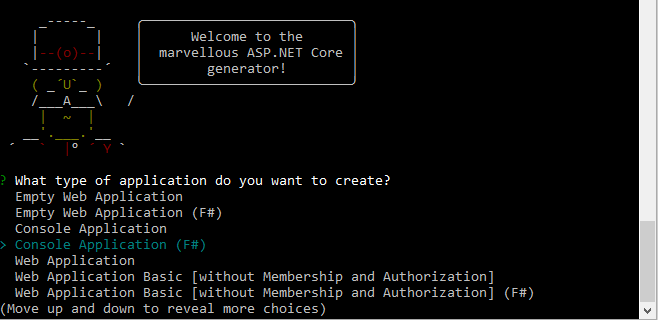
Some of the options here are directly based on the templates available in Visual Studio 2015 whereas others are unique to the Yeoman generator.
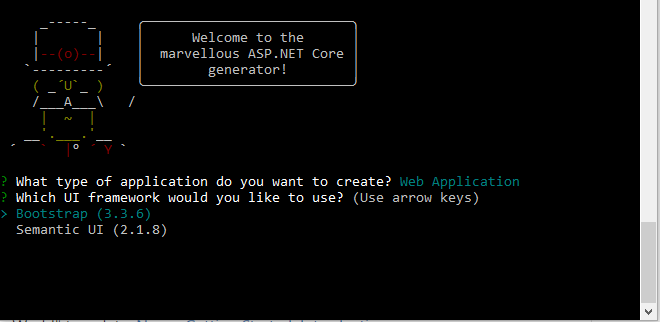
Depending on the one you choose, you may also be prompted with a further choice about using Bootstrap or Semantic UI as your UI framework.

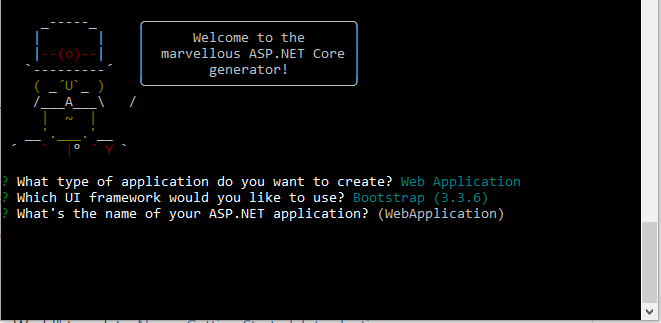
Finally you’ll need to specify a name for your app. Yeoman will use this name for the folder it creates (which will contain your source files).

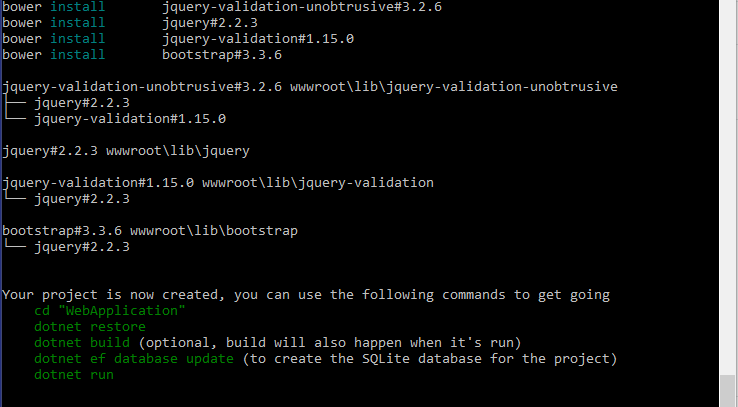
With that done, Yeoman will set to work and create various files as well as restoring any Bower packages that your chosen template requires.

Which template you chose will affect what guidance you see when Yeoman has finished creating your app.
In most cases you’ll want to change to your app’s directory, restore any dotnet dependencies and run the app.
cd WebApplicationdotnet restoredotnet runCreating files with Yeoman#
Once your project’s up and running you can also use Yeoman to scaffold files for your application.
For example, if you want to create a controller you can use this command.
cd Controllersyo aspnet:mvccontroller YourControllerNote you need to navigate to the folder you want the file created in (the generator won’t use any conventions to choose a folder for you, instead it just uses the working directory).
That command will create a controller that looks something like this…
using System;using System.Collections.Generic;using System.Linq;using System.Threading.Tasks;using Microsoft.AspNetCore.Mvc;
namespace WebApplication.Controllers{    public class YourController : Controller    {        // GET: /<controller>/        public IActionResult Index()        {            return View();        }    }}
Yeoman refers to these commands as Sub Generators.
There are lots of interesting looking sub generators, for example if you wanted to create your own middleware you could try this one.
yo aspnet:middleware MyMiddleware
And you’ll get this…
using System;using System.Collections.Generic;using System.Linq;using System.Threading.Tasks;using Microsoft.AspNetCore.Builder;using Microsoft.AspNetCore.Http;
namespace WebApplication{    // You may need to install the Microsoft.AspNetCore.Http.Abstractions package into your project    public class MyMiddleware    {        private readonly RequestDelegate _next;
        public MyMiddleware(RequestDelegate next)        {            _next = next;        }
        public Task Invoke(HttpContext httpContext)        {
            return _next(httpContext);        }    }
    // Extension method used to add the middleware to the HTTP request pipeline.    public static class MyMiddlewareExtensions    {        public static IApplicationBuilder UseMyMiddleware(this IApplicationBuilder builder)        {            return builder.UseMiddleware<MyMiddleware>();        }    }}
Be sure to check out the full list of sub generators for the ASP.NET generator.
In Summary#
If you want a quick way to create your .NET Core app (and a handy way to add files to it afterwards) then Yeoman is a useful option.
For more on Yeoman itself check out the Yeoman web site.
The ASP.NET generator lives on Github.
Finally, if you don’t want to use Yeoman here are three alternatives.
photo credit: hawkflight1066 “Under Reconstruction. Office blocks to apartments, Victoria Avenue, Southend on Sea, Essex England May 2017” via photopin (license)
Struggling to figure out what to focus on with Blazor?
BlazorSharp - The .NET Web Developers community is here to help!
- Connect with your fellow .NET web developers
- Keep up to date with the latest .NET changes
- Exchange tips, tools and tactics