Secure your ASP.NET Core 2.0 API (part 2 - restrict access to JWT bearers only)
Your API is wide open
If you read part 1, you know now what a JWT is and how to issue one.
We’ve provided a convenient way for clients to gain access to restricted areas of our API…
… but, we haven’t actually restricted anything.

If you leave your API open like this, your SPA can make requests to it, but so can anyone else.
As a minimum we want to ensure the client making a request to our API has a valid token (which they got by calling our JWT-issuing action, with a valid username and password).
The plan
Our plan of attack:
- Require authentication for our API controllers
- Test that anonymous requests are rejected
- Configure JWT auth in startup.cs
- Test that requests with a valid JWT are accepted
Require Authentication
With the [Authorize] attribute you can easily lock down your API to authorized users only.
[Authorize]
[Route("api")]
public class ApiController : Controller
{
    [HttpGet("Test")]
    public IActionResult Test()
    {
        return Ok("Super secret content, I hope you've got clearance for this...");
    }

    // rest of controller goes here
}
Now, unless otherwise specified, every action in this controller will require the request to be authenticated.
Test anonymous requests
Try navigating to your http://yourapihere/api/test and you’ll get a 401 Unauthorized response.
So our API is definitely secure, but now we have the opposite problem to before, no one can get past this barrier.
Authenticate JWTs
In ASP.NET Core 2.0, configuring JWT auth is pretty straightforward.
In most cases, you just need to configure it in startup.cs.
public void ConfigureServices(IServiceCollection services)
{
    services.AddAuthentication(JwtBearerDefaults.AuthenticationScheme)
        .AddJwtBearer(options =>
        {
            options.TokenValidationParameters = new TokenValidationParameters
            {
                ValidateIssuer = true,
                ValidateAudience = true,
                ValidateLifetime = true,
                ValidateIssuerSigningKey = true,
                ValidIssuer = "yourdomain.com",
                ValidAudience = "yourdomain.com",
                IssuerSigningKey = new SymmetricSecurityKey(
                    Encoding.UTF8.GetBytes(_configuration["SecurityKey"]))
            };
        });

    services.AddMvc();
}
These are the basic options for configuring JWT auth for your site.
This code configures ASP.NET Core so that requests to API actions (which require authentication) will check for a token meeting these requirements:
- issued with the correct issuer and audience details
- signed with the same secret key that we’re using (from configuration)
- hasn’t expired
If you’re wondering where _configuration came from (it may be missing in your startup.cs file), you can easily bring it in via the constructor and let ASP.NET Core wire it up for you.
public Startup(IConfiguration configuration)
{
    _configuration = configuration;
}
Whilst you’re here you’ll also need to add one line to the Configure method in startup.cs.
public void Configure(IApplicationBuilder app, IHostingEnvironment env)
{
    if (env.IsDevelopment())
    {
        app.UseDeveloperExceptionPage();
    }

    app.UseAuthentication();

    app.UseMvc();
    app.UseStaticFiles();

}
Your Configure method may vary but the key part is adding app.UseAuthentication();.
This needs to be one of the first lines (and definitely before UseMvc) so it takes effect early in the pipeline and stops ASP.NET Core from serving the request as soon as possible if the user isn’t authorised.
Test valid requests
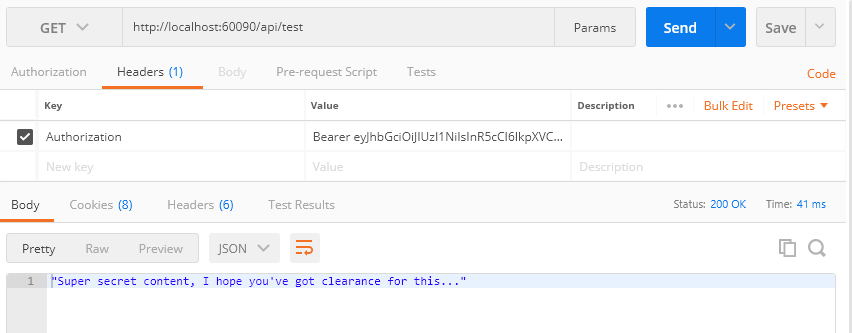
Now to the final hurdle, can we get to our test API method if we pass a valid token?
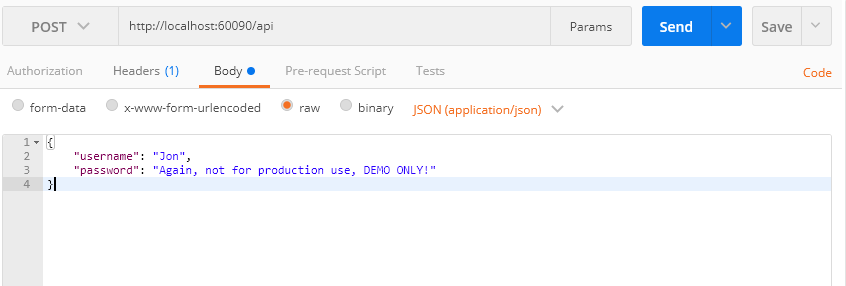
First up, we can hit the API action we created in part 1, to get a JWT.


Then modify the headers for our API GET request, to pass that token in the Authorization header.
Authorization: Bearer <token goes here>

So now what?
You can issue a JWT and validate it. Your app is now protected from meddling by anonymous users.
This approach is known as Bearer Token Authentication where your app issues a token and then gives access to the bearer of that token.
If you have a valid token, you’re in.
Photo Credits:
Jez B Fairly pointless… via photopin (license)
Theo Crazzolara Stop, it’s winter via photopin (license)