I command you…#
If the last lesson was all about representing queries in our application (“please give me this data”) this one is all about issuing commands.
Commands generally change data in your application and execute key business logic.
The obvious command for us to build first is one for posting new tweets.
But, hold your horses, you may have noticed we don’t actually have a “store” for our tweets yet; the query we added last time just returns hardcoded data.
We could go ahead and bring in an actual database at this point, maybe utilising something like EF Core to interact, but our focus is to figure out how to model commands and queries, and hook them up to a front end (Blazor in this case) so we’ll take a pragmatic approach and use a fake “in memory” data store so we can keep moving forward.
To create a fake data store for tweets we really just need to hold a collection of them in memory somewhere. We can then read from, and add to this collection and it will act as a proxy for a real database at some point down the line.
Add this Store.cs class somewhere in your application (the Data folder looks like as good a place as any).
using System.Collections.Generic;using System.Linq;
namespace MyTweets.Data{    public class Store    {        public IList<Tweet> Tweets { get; set; } = new List<Tweet>        {            new Tweet            {                Contents = "One from the backend"            }        };
        public void Add(Tweet tweet)        {            Tweets.Add(tweet);        }    }
    public class Tweet    {        public string Contents { get; set; }    }}
So this is really just a model (Tweet) and a collection to store Tweets in. This class also exposes a method for adding a new tweet.
If you’ve used Entity Framework Core you’ll be familiar with the DbContext. This Store class is essentially our pretend DBContext and is merely here to give us somewhere to “store” our tweets.
To use this “store” in our application we’ll want to register it with the Microsoft Dependency Injection framework (thus making it available to be injected into any class in our application).
Add the following to ConfigureServices in Startup.cs.
services.AddSingleton<Store>();With this in place, our application will hold one instance of this Store and forward all requests to it. This will suffice for testing our application but it’s worth reiterating; you’d want to swap this out for a real database for anything that’s actually going to be used by real people!
Update List.cs to fetch from the new store#
We have a store but we’re still retrieving hardcoded tweets at the moment when we run our List query. Let’s switch that over to use the new store.
Replace the contents of QueryHandler in List.cs with this…
public class QueryHandler : IRequestHandler<Query, Model>{    private Store _store;
    public QueryHandler(Store store)    {        _store = store;    }
    public async Task<Model> Handle(Query request, CancellationToken cancellationToken)    {        return new Model        {            Tweets = _store.Tweets                .Select(x => x.Contents)                .ToList()        };    }}
Note you’ll need to add a couple of new using statements as well:
using MyTweets.Data;using System.Linq;We’ve used ASP.NET Core’s dependency injection to bring in our Tweet store and mapped the Contents of each tweet into our Model (which, if you recall is simply a list of strings).
It’s all in the command#
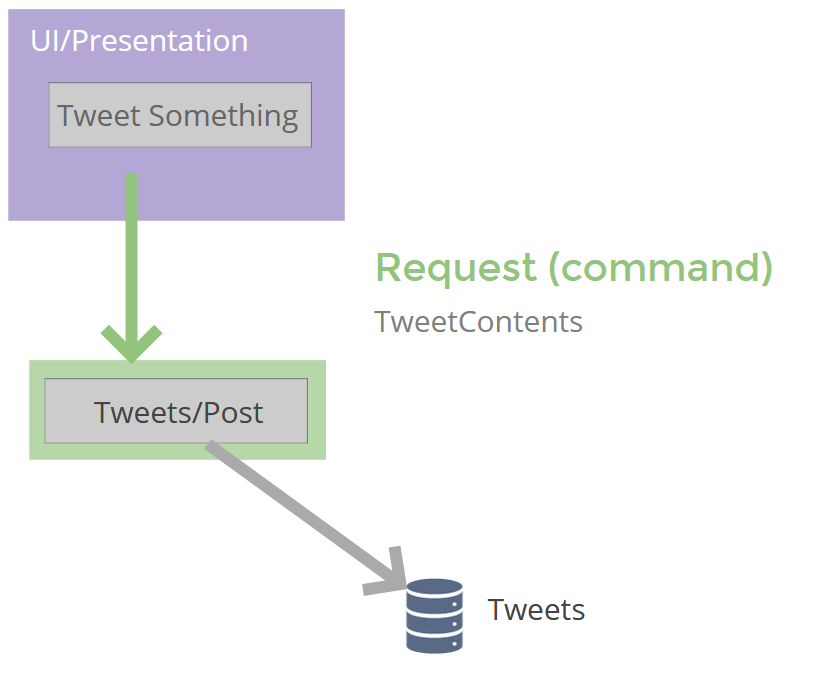
Now we need to create our command to post a new tweet.
Realistically this will take in the tweet contents, then add it to our store. Unlike Queries, Commands don’t necessarily return in a response.
We can model this in a very similar way to our earlier Query…
Add a Post.cs class to Features/Tweets and replace the contents with this…
using MediatR;using System;using System.Threading;using System.Threading.Tasks;using MyTweets.Data;
namespace MyTweets.Features.Tweets{    public class Post    {        public class Command : IRequest        {            public string Contents { get; set; }        }    }}
This is our command. All we need (for now) are the contents of the tweet itself.
Now we can add a handler, just below the Command class (but still nested inside the Post class).
public class CommandHandler : AsyncRequestHandler<Command>{    private readonly Store store;
    public CommandHandler(Store store)    {        this.store = store;    }
    protected override async Task Handle(Command request, CancellationToken cancellationToken)    {        store.Add(new Tweet { Contents = request.Contents });    }}
Because this is a command and doesn’t need to return data I’ve opted to implement AsyncRequestHandler instead of IRequestHandler. The main difference being AsyncRequestHandler doesn’t require us to return a response.
A little bit of UI goes a long way#
Now we just need to “hook this up” to the front end.
Blazor has a few tricks up its sleeve for posting data…
Head over to the Pages/Tweets/ folder and add a new Razor Component called PostNew.razor.
Replace its contents with the following…
@using MediatR@using Features.Tweets@inject IMediator Mediator
<EditForm OnValidSubmit="@HandleSubmit" Model="@command" class="mb-3">    <div class="form-group">        <InputTextArea @bind-Value="@command.Contents"                       class="form-control" />    </div>    <button type="submit" class="btn btn-primary">        Tweet it!    </button></EditForm>

@code {    private Post.Command command = new Post.Command();
    private async Task HandleSubmit()    {        await Mediator.Send(command);    }}
Aside from a little Bootstrap, we’re using a Blazor control called EditForm and binding it to a new instance of our Post.Command (the command we added a moment ago).
It is entirely possible to use a standard HTML form element here but EditForm gives us some bonus functionality; not least built in support for validation.
With our form in place we can bind a text area (using Blazor’s InputTextArea in this case) to the Contents property on our command.
Now, whenever we type something into the text area, the command’s Contents property will be updated based on what we typed in.
Finally, when the form is submitted it will invoke our HandleSubmit method which calls MediatR to “send” our command.
Our CommandHandler will then kick in and add a new tweet to the “store” we created earlier.
Time to tweet#
So we have a PostNew component but we’re not showing it anywhere (yet).
You can show this component wherever you want but for now I’ll add it to List.razor.
<h3>Tweets</h3>
<PostNew />
@foreach (var tweet in _tweets){    <Tweet Text="@tweet"/>}
With this in place launch your application in the browser and try posting a new tweet. The tweet should be added to our store; refresh the page to see it appear in the list of tweets!
Nearly there, but that last step (refreshing to see the new tweet) feels a little, well, clunky…
A better option would be to trigger a refresh of the tweets when a new one is posted.
What’s in a callback#
Blazor has a handy concept called callbacks for exactly this kind of requirement.
We can update PostNew to invoke a callback when we’ve finished saving the new tweet.
Head over to PostNew.razor and update your @code block to look like this:
@code {    private Post.Command command = new Post.Command();
    [Parameter]    public EventCallback OnPosted { get; set; }
    private async Task HandleSubmit()    {        await Mediator.Send(command);        await OnPosted.InvokeAsync(EventArgs.Empty);    }}
Now, when we post a new tweet, after we actually “save” the tweet we invoke our OnPosted callback. EventCallbacks require an argument, but in this case we’re just using it to signal that something has happened so can pass EventArgs.Empty as the argument.
Now we can use this callback in our List component to run our tweets query again, and update itself accordingly…
@using MediatR@inject IMediator Mediator
<h3>Tweets</h3>
<PostNew OnPosted="LoadTweets"/>
@foreach (var tweet in _tweets){    <Tweet Text="@tweet"/>}
@code {    private List<string> _tweets;
    protected override async Task OnInitializedAsync()    {        await LoadTweets();    }
    private async Task LoadTweets()    {        var model = await Mediator.Send(new Features.Tweets.List.Query());        _tweets = model.Tweets;    }}
First up I’ve extracted the little bit of code needed to retrieve our list of tweets into its own method. This way we can still call it from OnInitializedAsync but also call it any other time we need to.
Then I’ve wired up the OnPosted callback from our PostNew component to also call LoadTweets.
Separation of concerns FTW#
So there it is.
You now have a handy mechanism to model your application as a serious of queries and commands, leaving you free to bolt on whichever UI framework comes along without making major changes to your application.
I’ve used this approach on several large projects and the good news is this scales; so no matter how complex or large your application becomes, you can nearly always break it down into a number of commands and queries, modelling them as we’ve done here.
If you’re wondering where to go next. Here are a couple of ideas for next steps…
- Reverse the order of the tweets list (currently showing newest tweets at the bottom)
- Add the ability to delete a tweet
- Add some more properties to a tweet (like date posted etc) and show these in the UI
As you approach these and subsequent tasks, just remember to keep all your business logic in the MediatR commands and queries. Keep the UI as dumb as possible and you’ll be well on your way to building an application which adapts and scales as new requirements come in.