Blazor by Example - Build a simple markdown editor
Blazor promises to empower C# developers to build modern web applications quickly, using a language and ecosystem they already know and understand.
So let’s see how this stacks up with a real-world requirement; building a simple markdown editor.
It’s hard to imagine a world without Markdown these days.
For everything from blog posts, to github issues and self published ebooks, Markdown has cemented its position has a convenient way to edit plain text, whilst maintaining some control over the ultimate format and appearance of your work.
Today’s Blazor example centres on building a markdown text editor.
The requirement is to provide a text box which accepts markdown and generates a live preview of the resulting HTML.
Here’s how I’d approach building something like this in Blazor:
- Create the basic HTML structure (rows, columns etc)
- Add the essential HTML elements (textarea in this case)
- Add bindings to make the textarea value sync with a field/property in the component
- Implement code to convert the markdown to HTML
- Render the HTML on screen
Legacy .NET web apps causing you grief?
Build modern, reliable web applications, faster with .NET and Blazor.
Build better .NET web appsCreate the initial structure and elements#
Let’s start with some basic HTML structure…
Editor.razor
@page "/markdown"
<div class="row">    <div class="col-6">        Editor goes here    </div>    <div class="col-6">        Preview goes here    </div></div>
I’m sticking to Bootstrap here because my CSS kinda sucks…
This gives us a simple two column layout for our page; now to add a textarea
@page "/markdown"
<div class="row">    <div class="col-6">        <textarea class="form-control"></textarea>    </div>    <div class="col-6">        Preview goes here    </div></div>
Run this and you’ll see a text area, nothing very interesting going on yet…
Bind your inputs to something#
Now we’re ready to take the next step; we need to take whatever is entered into the textarea and store it in our component’s state.
For this, we can use properties and Blazor’s binding syntax. We just need to declare a couple of attributes:
<textarea class="form-control" @bind-value="Body" @bind-value:event="oninput"></textarea>These attributes tell Blazor to bind the value of textarea to a property called Body and to update Body whenever the value of our textarea changes.
The result? Body will always reflects the contents of the textarea. Whenever the value of textarea changes, Body will be instantly updated with the new value.
Now you might have noticed we haven’t created a Body property anywhere yet.
Whilst it is possible to write all your Blazor UI logic in @code blocks in the razor files themselves, I generally prefer to put that code into a separate class.
Let’s create a component base class for our component and declare the Body property in there:
Editor.razor.cs
using Microsoft.AspNetCore.Components;
public class MarkdownEditorBase : ComponentBase{    public string Body { get; set; }}
Now we just need to update our component markup to inherit this component base class and, whilst we’re here, add a binding to render the current value of Body.
This way we can check that ‘Body’ definitely does update as we change the contents of the textarea.
@page "/markdown"@inherits MarkdownEditorBase
<div class="row">    <div class="col-6">        <textarea class="form-control"            @bind-value="Body"            @bind-value:event="oninput">        </textarea>    </div>    <div class="col-6">        @Body    </div></div>
Run this, type something into the textarea and you’ll see an instant preview of what you typed.
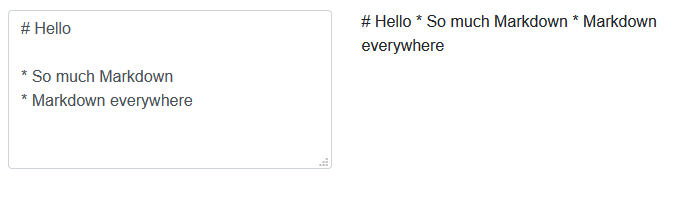
But, hold the phone, I promised an all-singing and dancing HTML preview…
As it stands, if you throw markdown at this textarea you’re just going to see that markdown in the preview, exactly as you typed it…
From markup to HTML#
Happily, we don’t need to expend much effort to get HTML from this markup, we can employ the excellent Markdig .NET Markdown processor to do it for us.
Bring in the NuGet package…
Install-Package MarkdigMarkdig will take any text and process the Markdown for us, spitting HTML out the other end.
Let’s add a new Preview property to our component which will invoke Markdig every time we request its value.
using Markdig;using Microsoft.AspNetCore.Components;
public class MarkdownEditorBase : ComponentBase{    public string Body { get; set; } = string.Empty;    public string Preview => Markdown.ToHtml(Body);}
I’ve also updated Body so it will always have an initial empty string value (rather than being null which would trip Markdig up).
Now we can update our component markup to render this preview instead of Body
<div class="col-6"> <textarea class="form-control" @bind-value="Body" @bind-value:event="oninput"></textarea></div><div class="col-6"> @Preview</div>Run this now and tada…

I mean, it’s HTML, but not the glorious preview we were hoping for.
Ideally we’d want to actually render the HTML and get a sense of how our content is shaping up; seeing the raw HTML itself isn’t much use.
Luckily Blazor has one more trick up its sleeve; rendering raw markup.
By default Blazor won’t just push this markup out for your browser to render; after all, if you blindly accept code you don’t own and run it in the browser, any number of bad things could happen!
But if you’re happy with the risks, you can force Blazor to spit this code out raw and let the Browser do as it pleases.
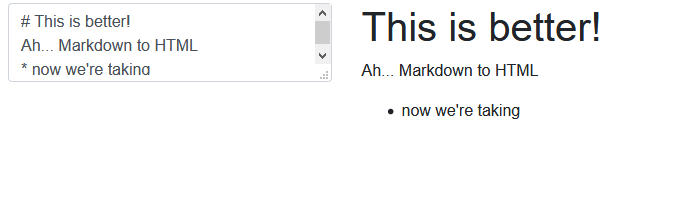
<div class="col-6"> @((MarkupString) Preview)</div>Now we’re talking.
Type markdown in on the left, get HTML rendered on the right.
Summary#
Sometimes as a developer you come up against a requirement which you expect to be complex (and take ages) to build, and every now and again it turns out to be easier than you thought.
In this case, building a simple markdown editor using Blazor turned out to be pretty straightforward.
Markdig does all the heavy lifting and a tiny amount of Blazor binding syntax handles the rest.
Check out the complete source code for this example here.
Legacy .NET web apps causing you grief?
Build modern, reliable web applications, faster with .NET and Blazor.
Build better .NET web apps